Part II: Types, Memory, and Core Language Internals
Part II of the C# Mastery Guide delves into the core types and memory management principles that underpin C# programming. This section provides a deep understanding of how types are defined, how memory is managed, and the intricacies of the Common Type System (CTS) and the Common Language Runtime (CLR).
Table of Contents
3. The Common Type System (CTS): Values, References, and Memory Layout
- 3.1. The Stack and the Heap: A definitive guide to where your data lives. Exploring method calls, stack frames, and object allocation strategies.
- 3.2. The Great Unification:
System.Object: Understanding the ultimate base type for all C# types and the foundational role of type metadata and the Method Table. - 3.3. Value Types (
struct): In-depth analysis of their memory layout, whySystem.ValueTypeexists, storage implications on the stack or inline within objects, performance characteristics, and the Method Table’s role for unboxed instances. - 3.4. Reference Types (
class): Understanding object headers (Method Table Pointer, Sync Block Index), how object references are stored, the detailed contents of the Method Table, and its relationship toSystem.Typeand reflection. - 3.5. Boxing and Unboxing: How value types are converted to objects (boxing), the associated significant performance costs, and strategies to avoid it.
- 3.6. Scope and Lifetime: Differentiating lexical scope in C# (compile-time visibility) from object lifetime managed by the Garbage Collector (runtime memory management).
- 3.7. Default Values and the
defaultKeyword: Understanding the default initialization values for built-in types (e.g.,intto0,booltofalse, reference types tonull), and thedefaultkeyword for obtaining these values for any type.
4. Memory Management and Garbage Collection
- 4.1. The .NET Generational Garbage Collector: How the tracing GC works. Detailed explanation of Generations 0, 1, and 2, and the mark-and-compact algorithm.
- 4.2. The Large Object Heap (LOH): Understanding why large objects (arrays, strings) are treated differently, their allocation patterns, and the problem of fragmentation on the LOH.
- 4.3. Finalization and
IDisposable: TheDisposepattern for deterministic cleanup of unmanaged resources vs. non-deterministic finalizers. Coversusingstatements,usingdeclarations (C# 8), andawait usingforIAsyncDisposable(C# 8). - 4.4. Weak References: Using
WeakReference<T>for scenarios like caching, preventing strong references from hindering garbage collection, and avoiding memory leaks. - 4.5. Advanced GC: Deep dive into Workstation vs. Server GC modes, concurrent collection, and tuning the GC behavior with
GCSettingsfor specific application needs.
5. Assemblies, Type Loading, and Metadata
- 5.1. Assembly Loading: How the CLR resolves, locates, and loads assemblies during runtime, including the role of
AssemblyLoadContextfor isolation. - 5.2. Organizing Code: Namespaces, File-Scoped Namespaces (C# 10), and Global Usings (C# 10): How namespaces function as a compile-time construct, the benefits of file-scoped namespaces for conciseness, and the impact of global usings on project-wide imports.
- 5.3. Reflection and Metadata: Reading and manipulating type information at runtime using
System.Reflection. Understanding the performance cost and the immense power of late binding. - 5.4. Dynamic Code Generation with
System.Reflection.Emit: Emitting Common Intermediate Language (IL) at runtime to dynamically create types, methods, and assemblies. - 5.5. Runtime Type Handles and Type Identity: Understanding the internal representation and significance of
RuntimeTypeHandle,RuntimeMethodHandle, andRuntimeFieldHandlefor unique type and member identification. - 5.6. Attributes: Metadata for Control and Information: Common Usage and Core Behaviors: A deep dive into frequently used built-in attributes (e.g.,
[Obsolete],[Serializable],[Conditional],[MethodImpl],[DllImport]), explaining their purpose and how they influence the compiler, runtime, or external tools. - 5.7. Custom Attributes: Definition, Usage, and Reflection: How attributes are defined, applied to code elements, processed at compile-time by tools, and discovered/interpreted at runtime via reflection.
6. Access Modifiers: Visibility, Encapsulation, and Advanced Scenarios
- 6.1. Fundamental Modifiers (
public,private): Their basic scope and usage within a type and within a project. - 6.2. Assembly-level Modifiers (
internal,fileC# 11): Controlling visibility across assembly boundaries, including theInternalsVisibleToattribute for controlled internal exposure. - 6.3. Inheritance-based Modifiers (
protected,private protectedC# 7.2,protected internal): Nuances of access within class hierarchies, and the precise distinctions betweenprivate protected(accessible only within derived types in the same assembly) andprotected internal(accessible within derived types in any assembly, or any type in the same assembly). - 6.4. Default Access Levels: What default access is applied to types and members if no modifier is explicitly specified.
3. The Common Type System (CTS): Values, References, and Memory Layout
At the heart of the .NET ecosystem lies the Common Type System (CTS). The CTS is a fundamental specification that defines how types are declared, used, and managed in the .NET runtime, ensuring that types written in different .NET languages can interact seamlessly. A deep understanding of the CTS, particularly the distinction between value types and reference types and their respective memory layouts, is paramount for writing high-performance, robust, and idiomatic C# code. This chapter will take you on a detailed tour of where your data resides and how the runtime manages it.
3.1. The Stack and the Heap
Before delving into specific type categories, it’s essential to understand the two primary memory regions managed by the Common Language Runtime (CLR) where your application’s data lives: the Stack and the Heap.
The Stack
The stack is a contiguous block of memory that operates on a Last-In, First-Out (LIFO) principle. It’s primarily used for:
- Method Calls (Stack Frames): When a method is called, a new stack frame is pushed onto the stack. This frame contains:
- The return address (where to resume execution after the method completes).
- The method’s arguments.
- Local variables declared within the method.
- Value Type Storage: Instances of value types (like
int,bool,structs) declared as local variables or method parameters are stored directly on the stack. - Reference Storage: For reference types, the reference (memory address) to the object on the heap is stored on the stack as a local variable or method argument.
Characteristics of the Stack:
- Extremely Fast: Allocation and deallocation are incredibly quick, involving only moving a pointer (the stack pointer).
- Automatic Management: Memory is automatically reclaimed when a method returns (the stack frame is popped). This makes stack-based allocations very efficient and predictable.
- Limited Size: The stack has a relatively small, fixed size (typically 1MB or a few MBs, depending on configuration and OS), making it unsuitable for large or long-lived data.
- Thread-Specific: Each thread in a .NET process has its own separate stack.
Diagram of the stack during method calls:
                  ʌ Stack Grows Upwards (towards lower addresses)
                  |
    +--------------------------+
    | MethodC's Stack Frame    |  <-- Stack Pointer
    | - LocalVarC              |
    | - ArgC                   |
    | - ReturnAddress_B        |
    +--------------------------+
    | MethodB's Stack Frame    |
    | - LocalVarB              |
    | - ArgB                   |
    | - ReturnAddress_A        |
    +-------------------------=+
    | MethodA's Stack Frame    |
    | - LocalVarA              |
    | - ArgA                   |
    | - ReturnAddress_Main     |
    +--------------------------+
    | Main Method's Stack Frame|
    | - ...                    |
    +--------------------------+
When MethodC completes, its stack frame is popped, and the memory becomes immediately available for the next method call.
The Heap
The heap is a much larger pool of memory used for dynamic memory allocation. It’s where instances of reference types (like classes, strings, objects, arrays) are stored.
Characteristics of the Heap:
- Dynamic Allocation: Memory is allocated on demand using the
newoperator. The CLR finds a suitable block of memory on the heap. - Slower Allocation: Compared to the stack, allocating on the heap is slower because the runtime needs to find free memory blocks and manage them.
- Garbage Collected: Memory on the heap is automatically managed by the .NET Garbage Collector (GC). Objects remain on the heap as long as there are references to them. Once an object is no longer referenced, it becomes eligible for collection, and the GC will eventually reclaim its memory. This “automatic” management simplifies development but introduces non-deterministic deallocation.
- Global Access (within process): Heap objects can be accessed from anywhere in the application as long as a valid reference exists.
- Larger Size: The heap can grow and shrink dynamically as needed, limited only by available system memory.
Diagram showing stack and heap interaction:
+---------------------------+      +-------------------------------------------+
|           Stack           |      |                  Heap                     |
+---------------------------+      +-------------------------------------------+
| main() frame              |      |   Object A (e.g., MyClass instance)       |
|  - MyClass objRef         | ---> |   [Address of MyClass instance]           |
|  - int x = 10;            |      |   Array item values                       |
|  - int[] arr = new int[5] | ---> |   [Address of the array values]           |
+---------------------------+      +-------------------------------------------+
In this diagram, x (a value type) lives directly on the stack. objRef (a reference type variable) also lives on the stack, but its value is a memory address pointing to the actual MyClass instance, which lives on the heap. The arr array itself is allocated on the heap, but the arr variable lives on the stack and holds a reference to the array’s memory address.
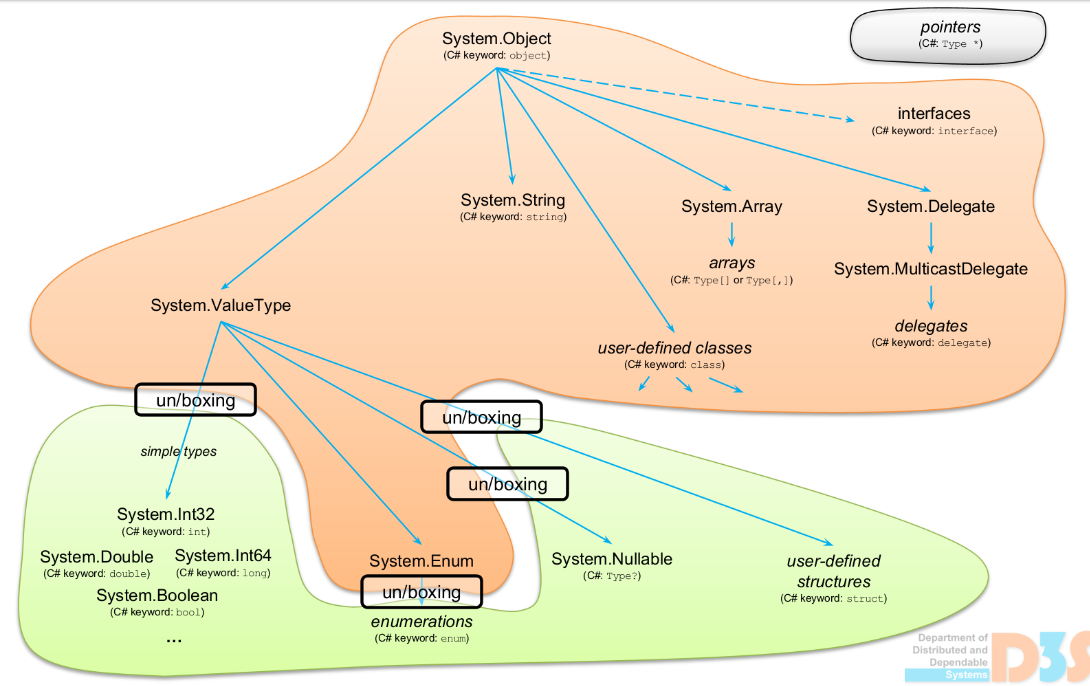
3.2. The Great Unification: System.Object
At the very top of the .NET type hierarchy resides System.Object. This class is the ultimate base type for every other type in the Common Type System (CTS), regardless of whether it’s a value type or a reference type. This “great unification” is fundamental to .NET’s power, enabling polymorphism, reflection, and cross-language interoperability.
Polymorphism is a core concept in object-oriented programming that allows objects of different types to be treated through a common interface, enabling the same operation or method call to behave differently depending on the actual type of the object at runtime. C# achieves this via inheritances, abstract classes and virtual methods.
The Root of All Types
Because all types implicitly or explicitly derive from System.Object, you can treat any instance of any type as an object. This allows for highly flexible code, enabling you to write methods that operate on generic object instances or to store diverse types in collections of object.
object obj1 = 10;                // An int (value type) boxed to object
object obj2 = "Hello";           // A string (reference type)
object obj3 = new MyClass();     // A custom class (reference type)

List<object> mixedList = new List<object> { obj1, obj2, obj3 };
// All can be treated uniformly as objects
For more details on System.Object, consult the official System.Object Class documentation on Microsoft Learn.
System.Object Methods
System.Object defines a small set of fundamental instance methods that all derived types inherit and can override. These methods include:
public virtual bool Equals(object obj): Determines whether the specified object is equal to the current object. By default, for reference types, this performs a reference equality check (do both variables point to the exact same object in memory). For value types, the defaultSystem.ValueType.Equalsimplementation performs a field-by-field comparison (though this can be inefficient via reflection).Object.Finalize(): Special method declared as~MyClass() { ... }in C#, which is called by the garbage collector before reclaiming the object’s memory. This finalizer method is used to release unmanaged resources. However, it is generally recommended to implement theIDisposableinterface and use theDisposepattern for deterministic cleanup instead of relying on finalizers.public virtual int GetHashCode(): Serves as a hash function for a particular type. It’s crucial for types used as keys in hash-based collections (Dictionary<TKey, TValue>,HashSet<T>). The default implementation typically returns a hash based on the object’s reference (for reference types) or a reflection-based hash for value types.public Type GetType(): Returns the exact runtimeSystem.Typeof the current instance. This method issealed, meaning it cannot be overridden.protected object MemberwiseClone(): Creates a shallow copy of the current object by copying the nonstatic field values (including private fields). This is useful for implementing cloning behavior in derived classes.public static bool ReferenceEquals(object objA, object objB): Determines whether the specifiedObjectinstances are the same instance in memory.public virtual string ToString(): Returns a string that represents the current object. The default implementation typically returns the fully qualified name of the type (e.g., “MyNamespace.MyClass”).
The Equals, GetHashCode and ToString methods are virtual precisely because their behavior often needs to be specialized by derived types to provide meaningful semantics (e.g., custom value equality, useful string representations).
Type Metadata and the Method Table (MT)
At the heart of the CLR’s understanding of types lies type metadata. Every single type definition in a .NET application — be it a class, struct, enum, interface, or delegate ─ has associated static metadata. This metadata is the CLR’s comprehensive blueprint for that type.
This metadata is primarily organized and managed internally by a structure conceptually referred to as the Method Table (MT). While the exact internal implementation name might vary (e.g., EEClass in some CLR versions), the concept remains consistent: it’s a static, per-type data structure that defines everything the CLR needs to know about a type at runtime.
- Universal Presence: It’s crucial to grasp that a Method Table exists for every type definition. This is not exclusive to classes or objects on the heap. Even a simple
intor a customstructhas an associated Method Table defining its characteristics.
Contents of the Method Table
The Method Table itself is a static, per-type data structure that serves as the CLR’s comprehensive blueprint for a type. It contains:
- Pointers to JIT-compiled native code for all type methods: Includes both instance and static methods as well as the crucial Virtual Method Table (V-Table), which is an array of function pointers specifically for virtual methods defined in the type or its base classes. When a virtual method is called on an object, the CLR uses the MT pointer to find the V-Table, then the appropriate entry for the method based on the object’s actual runtime type, enabling polymorphism.
- Type identity information: The type’s full name, a pointer to its base type’s Method Table, and a list of all interfaces it implements. This allows the CLR to perform
isandaschecks at runtime. - Object layout information: The total size of the object in memory (excluding the header), and the offsets of its instance fields within the object. This tells the CLR how to interpret the bytes following the header as the object’s data.
- Pointers to the locations of static fields: Static fields are stored once per type, not per instance, and the MT points to where this static data resides.
- Various flags and other metadata: Used by the CLR for internal runtime checks, security validations, and optimizations.
Connection to System.Type and Reflection
The CLR leverages these low-level metadata structures, particularly the Method Table, to construct and manage System.Type objects. When you use typeof(MyClass) or myInstance.GetType(), the CLR internally consults the relevant Method Table (or its internal representation, a TypeHandle) to retrieve or (lazily) create a System.Type object. This System.Type object is the managed API representation of a type’s metadata, providing the rich information that powers reflection (e.g., allowing you to enumerate methods, properties, fields, or even create instances at runtime, as discussed in Chapter 5).
The CTS’s reliance on System.Object as the universal root and the consistent use of Method Tables for all types are key enablers for .NET’s powerful features like garbage collection, type safety, and language interoperability.
3.3. Value Types (struct)
Value types directly contain their data. In C#, structs, enums, and all primitive types (like int, double, bool, char) are value types. They implicitly inherit from System.ValueType, which itself inherits from System.Object.
For more details on value types, consult the official Value Types documentation on Microsoft Learn.
Why System.ValueType Exists
System.ValueType serves several critical roles in the CTS:
- Semantic Marker: It acts as a base class that all value types implicitly inherit from, explicitly signaling to the CLR and the C# compiler their unique memory semantics (copy-by-value, direct data storage). This is how the runtime distinguishes between types that should reside on the stack/inline versus those that require heap allocation.
-
Consistent Base for Overrides: Although
System.ValueTypedoesn’t add any new members beyondSystem.Object, it provides crucial overrides forEquals()andGetHashCode():- The default
System.ValueType.Equals()provides value-based equality by performing a field-by-field (including private fields) comparison using reflection. - Similarly,
GetHashCode()provides a hash based on the field values, again using reflection.
While these default implementations are often inefficient (due to reflection and boxing),
System.ValueType’s existence ensures that all value types conceptually align with theSystem.Objecthierarchy while having distinct default behaviors for these crucial methods, encouraging developers to override them for performance. - The default
Memory Layout and Storage
The key characteristic of value types is where their data is stored, which is always directly embedded:
-
On the Stack: When a value type is declared as a local variable within a method or passed as a method parameter (by value, which is the default for value types), its entire data is allocated directly on the stack, within the current method’s stack frame.
struct Point { public int X; public int Y; } void CalculateDistance() { Point p1 = new Point { X = 10, Y = 20 }; // p1's data (X, Y) is on the stack int radius = 5; // radius's data (5) is on the stack // ... } // When CalculateDistance exits, p1 and radius are deallocated instantly. -
Inline within Reference Types (on the Heap): When a value type is a field of a reference type (a
class), its data is stored inline directly within the memory allocated for that reference type object on the heap. Crucially, no separate heap allocation occurs for the value type itself.class Circle { public Point Center; // Center (a Point struct) is stored directly within the Circle object on the heap public double Radius; } void CreateCircle() { Circle c = new Circle { Center = new Point { X = 0, Y = 0 }, Radius = 5.0 }; // The 'c' variable (reference) is on the stack. // The Circle object (including its Center and Radius data) is a single allocation on the heap. }In this scenario,
Point’sXandYdata do not cause a separate heap allocation; they are contiguous within theCircleobject’s memory block.
The Method Table and Value Type Instances (Deeper Dive)
As discussed, every C# type definition has a Method Table. This holds true for structs as well. The Method Table for Point (in our example) would contain information about its fields (X, Y), its default constructor, any custom methods (ToString(), Equals(), etc.), and its base type (System.ValueType).
However, and this is a critical distinction, instances of value types (when not boxed) do not contain a direct pointer to their Method Table in their memory layout.
Why? (A Core Design Choice for Efficiency): This design decision is a direct consequence of value types’ fundamental characteristics in C#:
- No Inheritance: Structs cannot serve as base classes for other classes or structs. They can only implement interfaces.
- No Virtual Methods: All methods defined on a
struct(or inherited fromSystem.ObjectandSystem.ValueType) are implicitlysealedand non-virtual.
Because of these restrictions, the exact type of a struct instance and the specific implementation of its methods are definitively known at compile time. This allows the JIT compiler to directly resolve method calls (e.g., p1.ToString()) or even inline the method code, without needing a runtime lookup via a Method Table pointer stored in each instance. Eliminating this pointer (typically 8 bytes on a 64-bit system) for every instance significantly saves memory, especially when many small structs are used.
Copy Semantics
This is the most fundamental operational difference between value types and reference types:
-
When a value type instance is assigned to another variable, passed as an argument to a method (by value, which is the default), or returned from a method, a complete bitwise copy of its entire data is made. The two variables then hold independent copies of the data.
Point p1 = new Point { X = 10, Y = 20 };
Point p2 = p1; // p2 is a *new, independent copy* of p1.
p2.X = 100;    // Changes p2.X, but p1.X remains 10.

Console.WriteLine($"p1: ({p1.X}, {p1.Y})"); // Output: p1: (10, 20)
Console.WriteLine($"p2: ({p2.X}, {p2.Y})"); // Output: p2: (100, 20)
This behavior implies that modifying one variable will not affect the other, which can be desirable for immutability or isolated operations.
The new Operator for Structs
When new is used with a struct (e.g., new Point()), it calls the struct’s constructor (or the implicit parameterless constructor) and initializes the memory allocated for the struct. Crucially, this operation does not cause a heap allocation for the struct instance itself. The memory is initialized either on the stack (for local variables) or inline on the heap (if the struct is a field of a class).
Performance Characteristics
- Fast Allocation/Deallocation: When allocated on the stack, value types offer superior performance due to the trivial nature of stack pointer manipulation.
- Reduced Garbage Collection Overhead: Since unboxed value types are stored on the stack or inlined on the heap, they are not individual objects managed by the GC. This significantly reduces GC pressure, leading to fewer and shorter GC pauses.
- Memory Locality: Data for value types is often stored contiguously in memory, which can improve CPU cache performance by reducing cache misses.
- Default
ValueTypeMethods: The default implementations ofEquals()andGetHashCode()can be inefficient due to reflection. Therefore, it’s often beneficial to override these methods in your structs for performance-critical applications. - Copy Cost Trade-off: For very large
structs (e.g., structs with many fields or large fields), the cost of copying the entire data on assignment or method calls can become substantial, potentially degrading performance. In such cases, passing thestructby reference using theinmodifier (C# 7.2+) can mitigate this copy cost:void ProcessPoint(in Point p) // p is passed by reference, cannot be modified { Console.WriteLine($"Processing point: ({p.X}, {p.Y})"); // p.X = 5; // Compile-time error: Cannot modify members of 'p' because it is an 'in' parameter } ref structandscoped ref(Advanced): C# 7.2 introducedref struct(e.g.,Span<T>,ReadOnlySpan<T>) which are strictly stack-allocated and cannot escape the stack, preventing accidental heap allocation and enabling powerful, high-performance memory manipulation. C# 11 addedscoped refparameters to further enforce safe usage ofreflocals andrefparameters. These features offer extreme performance by ensuring stack-only semantics.
Default struct Constructor
All structs implicitly have a public parameterless constructor that initializes all fields to their default values ━ e.g., 0 for numeric fields, false for bool, null for reference-type fields within the struct, and recursively default-initializes any nested structs.
3.4. Reference Types (class)
Reference types store a reference (a memory address) to the actual data, which resides on the managed heap. In C#, classes, interfaces, delegates, arrays, and strings are reference types. They all implicitly or explicitly inherit from System.Object.
For more details on reference types, consult the official Reference Types documentation on Microsoft Learn.
Memory Layout and Storage
- Always on the Heap: Instances of reference types are always allocated on the managed heap using the
newoperator. There is no concept of a reference type instance existing on the stack directly (only its reference might be on the stack). -
References on Stack or Heap: A variable declared as a reference type doesn’t contain the object itself; it contains a reference (a memory address or pointer) to the object’s location on the heap. This reference can be stored:
- On the stack (if it’s a local variable or method parameter).
- On the heap (if it’s a field of another reference type object).
class Customer { public string Name; public int Id; }

void CreateCustomer()
{
    Customer customer1 = new Customer { Name = "Alice", Id = 101 };
    // The 'customer1' variable (reference) is on the stack.
    // The Customer object data ("Alice", 101) is on the heap.
}
Object Header: Deep Dive
Every object allocated on the managed heap (instances of reference types, including boxed value types) incurs a small amount of overhead for the object header. This header, typically 16-24 bytes on 64-bit systems (due to factors like compressed pointers, which are often enabled by default), contains crucial information for the CLR to manage the object. The two primary components of the object header are:
1. Method Table Pointer (MT)
- Crucial Difference: Unlike unboxed value type instances, every instance of a reference type on the heap contains a direct pointer to its type’s Method Table in its object header. This pointer is fundamental for the CLR to understand the object at runtime.
- Purpose of the Method Table Pointer:
- Virtual Method Dispatch: When a virtual method is called on an object, the CLR uses this pointer to look up the Method Table, which contains the V-Table for virtual methods. This allows the CLR to resolve the correct method implementation based on the actual runtime type of the object, enabling polymorphism.
- Type Identity: The Method Table Pointer also serves as a quick way to determine the exact type of an object at runtime, facilitating operations like
is,as, and reflection.
2. Sync Block Index (SBI)
- An index into a table of synchronization blocks (managed internally by the CLR). This part of the header is used for various runtime services:
- Object Locking: When using
lockstatements orMonitorclass methods for thread synchronization, the SBI points to the entry in the Sync Block table that manages the lock for this specific object. - Object Hashing: If
GetHashCode()is called on an object and it hasn’t been overridden to return a custom hash, the default implementation often stores a hash code generated from the object’s memory address in the Sync Block entry. - Weak References: Used internally by the GC for managing weak references to the object (further discussed in Chapter 4).
- Object Locking: When using
Diagram of an object on the heap:
+-----------------------------------+ \
|   Method Table Pointer (MT)       | |
|-----------------------------------| | Object Header (16-24 bytes)
|   Sync Block Index (SBI)          | /
+===================================+ \
|   Field1 (e.g., Customer.Name)    | |
|-----------------------------------| |
|   Field2 (e.g., Customer.Id)      | | Instance Data (variable size)
|-----------------------------------| |
|   ...                             | |
+-----------------------------------+ /
Reference Semantics
-
When a reference type variable is assigned to another, passed as an argument, or returned from a method, only the reference (memory address) is copied, not the object’s data. Both variables will then point to the exact same object instance in memory.
Customer customer1 = new Customer { Name = "Alice", Id = 101 };
Customer customer2 = customer1; // customer2 now refers to the *same object* as customer1.
customer2.Id = 102;     // Changes the Id of the *single* object referenced by both.

Console.WriteLine($"customer1's Id: {customer1.Id}"); // Output: 102
Console.WriteLine($"customer2's Id: {customer2.Id}"); // Output: 102
This behavior enables shared state and is fundamental to object-oriented programming paradigms, but it also means that modifications through one reference are visible through all others.
string as a Special Reference Type
While string (System.String) is a class and thus a reference type, it exhibits some special behaviors that differentiate it from typical reference types:
- Immutability: Once a
stringobject is created, its content cannot be changed. Any operation that appears to modify a string (e.g.,string.Replace(),string.ToUpper()) actually creates a newstringobject and returns it. This immutability makes strings thread-safe and predictable. - String Interning: For efficiency, the CLR performs string interning for literal strings. If the same string literal appears multiple times in your code, the CLR might store only one copy of that string in a special pool (the “intern pool”), and all references to that literal will point to the same object. This can lead to
==(value equality) andReferenceEquals()(reference equality) both returningtruefor identical string literals.
string s1 = "Hello";
string s2 = "Hello";
string s3 = new StringBuilder().Append("He").Append("llo").ToString();

Console.WriteLine(s1 == s2);           // True (value equality)
Console.WriteLine(object.ReferenceEquals(s1, s2)); // True (due to interning of literals)

Console.WriteLine(s1 == s3);           // True (value equality)
Console.WriteLine(object.ReferenceEquals(s1, s3)); // False (s3 is a new object from StringBuilder)
Reference Type Performance Considerations
- Heap Allocation Cost: Allocating objects on the heap is slower than stack allocation and involves the CLR’s memory manager searching for free blocks.
- Garbage Collection Pressure: Every object on the heap contributes to the workload of the Garbage Collector. Creating many short-lived objects on the heap can increase GC frequency and duration, potentially leading to performance pauses in your application.
3.5. Boxing and Unboxing
The unification of all types under System.Object is powerful, but it comes with a performance cost when dealing with value types. Boxing is the process that allows a value type instance to be treated as an System.Object instance (or an interface type it implements). Unboxing is the reverse.
For more details on boxing value types, see the official documentation.
The Boxing Process
Boxing involves transforming a value type from its stack-allocated or inline-on-heap representation into a full-fledged object on the managed heap. This process is expensive because it involves several steps:
- Heap Allocation: A new object is allocated on the managed heap. The size of this allocated object is sufficient to hold the value type’s data plus the standard object header (which includes a Method Table Pointer and a Sync Block Index for this newly boxed type).
- Data Copy: The actual data of the value type is copied from its original location (stack or inline in another object) into this newly allocated heap object.
- Reference Return: A reference (memory address) to this new heap object is returned. This reference is then stored in the
objectvariable.
int myInt = 42;          // myInt is a value type, typically on the stack
object boxedInt = myInt; // BOXING occurs here

// Console.WriteLine(myInt == boxedInt); // Compile-time error:
// Operator '==' cannot be applied to operands of type 'int' and 'object'

Console.WriteLine($"Boxed int value: {boxedInt}");
Console.WriteLine($"Boxed int type: {boxedInt.GetType().Name}");

// Output:
// Boxed int value: 42
// Boxed int type: Int32
The Unboxing Process
Unboxing is the process of extracting the value type data from a previously boxed object.
- Type Check: The CLR first performs a runtime type check to ensure that the object reference being unboxed is indeed a boxed instance of the target value type. If the types don’t match (e.g., trying to unbox a boxed
intto adouble), anInvalidCastExceptionis thrown. - Data Copy: The data from the heap-allocated boxed object is copied back to a location suitable for the value type (e.g., a local variable on the stack or a field).
object boxedValue = 123;            // Already boxed
int unboxedValue = (int)boxedValue; // UNBOXING occurs here
Console.WriteLine($"Unboxed value: {unboxedValue}"); // Output: 123
Significant Performance Implications
Boxing and unboxing are considered expensive operations and represent a common performance pitfall in .NET applications, especially in hot code paths or tight loops.
- Heap Allocation Overhead: Boxing necessitates allocating memory on the managed heap, which is significantly slower than stack allocation and contributes to memory fragmentation.
- Data Copying Overhead: Data is copied at least twice: once during boxing (from source to heap) and potentially again during unboxing (from heap to target).
- Garbage Collection Pressure: Each boxed object is a distinct new object on the heap, increasing the number of objects the Garbage Collector needs to track and manage. Frequent boxing can lead to more frequent and longer GC pauses, impacting application responsiveness.
When Boxing to object Occurs
Boxing can happen implicitly or explicitly:
- Implicit Boxing:
- Passing value types to
objectparameters:void PrintObject(object obj) => Console.WriteLine(obj); int number = 100; PrintObject(number); // 'number' is implicitly boxed to object. - Adding value types to non-generic collections:
System.Collections.ArrayList myArrayList = new System.Collections.ArrayList(); myArrayList.Add(5); // int 5 is boxed myArrayList.Add(true); // bool true is boxed - Using
string.Format()orConsole.WriteLine()with value types: (Often optimized by compiler/runtime, but conceptual boxing can occur in older versions or for arbitraryobjectarguments).Console.WriteLine("Value: {0}", 123); // 123 is boxed to object to fit the {0} placeholder.
- Passing value types to
- Explicit Boxing (Casting):
int x = 10;
object y = (object)x; // Explicit cast to object, causes boxing.
Boxing to Interface Types
When a value type implements an interface, boxing occurs when the value type is assigned to an interface type variable. This allows the value type to be treated as an instance of the interface.
interface IPrintable { void Print(); }

struct Point : IPrintable
{
    public void Print() => Console.WriteLine("Point");
}

class Printer
{
    public static void PrintItem(IPrintable item) => item.Print();
}

Point point = new Point();
Printer.PrintItem(point); // Boxing occurs here, Point is boxed to IPrintable
This can however be prevented by using generic interfaces or methods, which allow you to work with value types without boxing.
interface IPrintable<T> { void Print(); }

struct Point : IPrintable<Point>
{
    public void Print() => Console.WriteLine("Point");
}

class Printer
{
    public static void PrintItem<T>(IPrintable<T> item) => item.Print();
}

Point point = new Point();
Printer.PrintItem(point);
No boxing occurs here because the method PrintItem<T> is generic and operates on IPrintable<T>, where T is the concrete type of the value being passed. The Point struct implements IPrintable<Point>, so the interface is closed over the value type itself. This allows the JIT to generate specialized, type-safe code that avoids boxing, since it can directly work with the value type without converting it to an object or reference type.
Value Types and Object.ReferenceEquals(object objA, object objB)
When comparing value types. If objA and objB are value types, they are boxed before they are passed to the ReferenceEquals method. This means that if both objA and objB represent the same instance of a value type, the ReferenceEquals method nevertheless returns false, as the following example shows.
int int1 = 3;
Console.WriteLine(Object.ReferenceEquals(int1, int1));
// Output: False (because int1 is boxed twice, creating two separate heap objects)
Strategies to Avoid Boxing
Avoiding boxing, especially in performance-critical sections of your code, is crucial for high-performance .NET development:
- Use Generics (
List<T>,Dictionary<TKey, TValue>, etc.): This is the most common and effective solution. Generics allow you to write type-safe code that works with value types (and reference types) without involvingSystem.Object, thus eliminating boxing.List<int> myIntList = new List<int>(); myIntList.Add(5); // No boxing int item = myIntList[0]; // No unboxing - Use Generic Interfaces: If you need to work with interfaces and boxing is an issue, define them as generic interfaces. This allows you to pass value types without boxing.
interface IProcessor<T> { void Process(T item); } struct IntProcessor : IProcessor<int> { public void Process(int item) { /* ... */ } } static void RunProcessor<T>(IProcessor<T> processor, T item) => processor.Process(item); - Use Specific Overloads: Prefer method overloads that accept the specific value type rather than
object. Span<T>andMemory<T>(C# 7.2+): For high-performance memory manipulation, especially with contiguous memory blocks (like arrays or strings), these types allow you to work directly with the underlying data without allocations or boxing.params ReadOnlySpan<T>(C# 13+): This feature allows efficient handling ofparamsarrays of value types, avoiding the allocation of a temporary array and potential boxing.
3.6. Scope and Lifetime
While often used casually, “scope” and “lifetime” are distinct concepts in C# with specific implications for how variables and objects are managed.
Scope (Lexical Scope / Compile-Time)
Scope defines the region of code within which a particular variable, method, or type is visible and can be accessed. It is primarily a compile-time concept, determined by the lexical structure (curly braces {}) of your source code.
- Block Scope: Variables declared within a code block (e.g., inside an
ifstatement,forloop, or method body) are only accessible within that block. Once execution leaves the block, the variable goes out of scope.void MyMethod() { int x = 10; // x is scoped to MyMethod if (x > 5) { string message = "Hello"; // message is scoped only to this 'if' block Console.WriteLine(message); } // Console.WriteLine(message); // Compile-time Error: 'message' does not exist in the current context } // x goes out of scope here - Method Scope: Parameters and local variables are scoped to the method they are declared in.
- Class/Struct Scope: Fields and methods are scoped to the class or struct they belong to. Access modifiers (
public,private,internal,protected,file) further refine visibility. - Namespace Scope: Types are scoped to their containing namespace.
- File Scope (C# 10+, C# 11+): With file-scoped namespaces (C# 10) and the
fileaccess modifier for types (C# 11), visibility can be constrained to a single source file, useful for utility types that don’t need broader exposure.
Scope is solely about visibility and accessibility enforced by the C# compiler.
Lifetime (Runtime / Memory Management)
Lifetime, in contrast, refers to how long the memory occupied by a variable’s value or an object instance persists at runtime. This is managed by the CLR.
- Stack-Allocated Data (Value Types, References):
- Lifetime: The lifetime of variables stored on the stack (e.g., local value type instances, local reference variables) is deterministically tied to the execution of the method. When a method returns, its entire stack frame is “popped,” and all data within that frame is instantly deallocated.
- Example: In
int x = 10;,x’s lifetime ends precisely when the method it’s declared in finishes execution.
-
Heap-Allocated Objects (Reference Type Instances, Boxed Value Types):
- Lifetime: The lifetime of objects residing on the managed heap is governed by the Garbage Collector. An object on the heap remains “alive” as long as it is reachable by the application. An object is reachable if there is at least one “root” reference pointing to it (e.g., a static field, a local variable on the stack, a CPU register, or a reference from another live heap object).
- Non-Deterministic Deallocation: When an object becomes unreachable (meaning no active references point to it), it becomes eligible for garbage collection. The GC will eventually reclaim its memory, but when this happens is non-deterministic and depends on factors like available memory, GC heuristics, and the specific GC mode (workstation vs. server, concurrent vs. non-concurrent). You cannot explicitly
deletean object in C#. -
Example:
class LargeData { public byte[] data = new byte[1000000]; }

void CreateAndForget()
{
    LargeData d = new LargeData(); // 'd' (reference) on stack, LargeData object on heap.
    // When CreateAndForget() returns, 'd' goes out of scope and its stack lifetime ends.
    // The LargeData object on the heap is now unreferenced and becomes eligible for GC.
} // The LargeData object's memory will be reclaimed *later* by the GC at an unspecified time.
It’s important to note that a variable going out of scope does not immediately mean the object it referenced on the heap is deallocated. The object’s lifetime continues as long as any reachable reference to it exists. Conversely, an object might still be in scope (e.g., a static field that was set to
null), but if its reference is broken, the object it pointed to becomes eligible for GC.
Understanding this clear distinction between compile-time scope and runtime lifetime is vital for managing memory, avoiding memory leaks (by ensuring objects become unreachable), and correctly handling resources that are not managed by the GC (e.g., file handles, network connections, which require explicit disposal, as covered in Chapter 4).
3.7. Default Values and the default Keyword
In C#, variables are always initialized to a predictable state upon declaration. The compiler and runtime enforce rules regarding default values to prevent the use of uninitialized memory, which is a common source of bugs in languages like C++.
For more details on default values, see the official documentation.
Implicit Default Initialization
The behavior of default initialization depends on where a variable is declared:
- Fields of Classes and Structs: All fields (instance variables) of a class or a struct are automatically initialized to their default values by the CLR. This happens regardless of whether an explicit constructor is called. This ensures that an object or struct always starts in a known state.
- Array Elements: When an array is created using
new[], all its elements are automatically initialized to their respective type’s default value. - Local Variables (Crucial Difference): Unlike fields and array elements, local variables declared within methods are not automatically initialized by the runtime. The C# compiler strictly enforces the “definite assignment rule”: you must explicitly assign a value to a local variable before you can read from it. Attempting to use an unassigned local variable will result in a compile-time error. This design prevents common bugs where uninitialized values might lead to unpredictable behavior.
Default Values for Built-in Types
| Type Category | Type Example | Default Value |
|---|---|---|
| Integral Numeric Types | int, byte, long, short, sbyte, uint, ulong, ushort |
0 |
| Floating-Point Types | float, double |
0.0 |
| Decimal Type | decimal |
0.0M |
| Boolean Type | bool |
false |
| Character Type | char |
\0 (the null character, Unicode code point 0) |
| Enumeration Types | Any enum |
The value 0 (even if no enum member is explicitly assigned 0) |
| Reference Types | Any class (including string), interface, delegate, array |
null |
Value Types (struct) |
Any struct |
All its fields are recursively initialized to their own default values. |
Example of Default Initialization:
class Item
{
    public int Quantity;          // Defaults to 0
    public bool IsAvailable;      // Defaults to false
    public string Description;    // Defaults to null
    public ProductInfo Details;   // Details.Id will be 0, Details.Name will be null, Details.Price will be 0.0M
}

struct ProductInfo // Defined in section 3.3
{
    public int Id;
    public string Name;
    public decimal Price;
}

void DemonstrateDefaults()
{
    Item newItem = new Item(); // Fields of newItem are default-initialized
    Console.WriteLine($"Quantity: {newItem.Quantity}");        // Output: Quantity: 0
    Console.WriteLine($"IsAvailable: {newItem.IsAvailable}");  // Output: IsAvailable: False
    Console.WriteLine($"Description: {newItem.Description ?? "null"}"); // Output: Description: null
    Console.WriteLine($"Details.Id: {newItem.Details.Id}");    // Output: Details.Id: 0

    int localCounter; // Local variable - not automatically initialized
    // Console.WriteLine(localCounter); // Compile-time Error: Use of unassigned local variable 'localCounter'
    localCounter = 10;
    Console.WriteLine(localCounter); // Output: 10
}
The default Keyword (default(T) or just default)
The default keyword provides a convenient and type-safe way to explicitly obtain the default value for any given type. This is particularly useful in generic contexts where the specific type T is not known at compile time.
default(T): This is the traditional syntax, returning the default value for the specified type argumentT.defaultliteral: Introduced in C# 7.1, this simplified syntax allows you to omit the type argument when the compiler can infer the type from the context (e.g., assignment target, return type).
// Using default(T) explicitly
T GetDefaultValue<T>()
{
    return default(T);
}

Console.WriteLine(GetDefaultValue<int>());          // Output: 0
Console.WriteLine(GetDefaultValue<string>() ?? "null"); // Output: null
Console.WriteLine(GetDefaultValue<DateTime>());     // Output: 1/1/0001 12:00:00 AM (default DateTime is its MinValue)

// Using the default literal (C# 7.1+)
int x = default;            // x is 0 (type inferred from context)
string s = default;         // s is null
bool b = default;           // b is false
ProductInfo defaultProduct = default; // defaultProduct's fields are all default-initialized

// In contexts where the type is clear
Func<int> getDefaultInt = () => default; // Type is inferred as int
Console.WriteLine(getDefaultInt()); // Output: 0
The default keyword ensures that you can always obtain the appropriate initial value for any type, promoting code correctness and consistency, especially when writing generic algorithms.
Key Takeaways
- The Stack and the Heap: The Stack is a fast, LIFO region for method execution, local value types, and object references; its memory is deterministically deallocated. The Heap is a slower, dynamic region for all reference type instances, managed non-deterministically by the Garbage Collector.
- The Great Unification:
System.Object: All C# types ultimately derive fromSystem.Object. It provides core methods (e.g.Equals,GetHashCode,ToString,GetType) and establishes the concept of a Method Table (MT) as the static blueprint for every type definition, containing essential metadata for the CLR. - Value Types (
struct):- Directly contain their data, implicitly inherit from
System.ValueType. - Stored on the stack (for locals/params) or inline within reference types on the heap.
System.ValueTypeexists as a marker and provides default value-basedEqualsandGetHashCodeoverrides.- Unboxed instances do NOT contain an MT pointer: This is a memory optimization because structs lack inheritance and virtual methods, allowing compile-time/JIT-time method resolution.
- Exhibit copy semantics: assignments create full independent copies.
newoperator for structs initializes memory but does not cause heap allocation (unless array creation or boxing).- Generally performant due to stack allocation and less GC pressure, but copy costs for large structs can be a trade-off (mitigated by
inparameters).
- Directly contain their data, implicitly inherit from
- Reference Types (
class):- Store a reference to their data, which always resides on the heap. Inherit directly from
System.Object. - Every object on the heap has an Object Header (approx. 16-24 bytes) containing a Method Table Pointer and Sync Block Index.
- The Method Table for reference types is pointed to by every instance and contains detailed information: V-Tables for virtual dispatch, type identity, object layout, static field pointers, and flags. It is the basis for runtime type information and reflection (
System.Type,TypeHandle). - Exhibit reference semantics: assignments copy references, leading to shared state.
stringis a special immutable reference type with interning.- Incur heap allocation and contribute to GC pressure.
- Store a reference to their data, which always resides on the heap. Inherit directly from
- Boxing and Unboxing:
- Boxing converts a value type to an
object(or interface) by allocating a new heap object, copying the value type’s data into it, and returning a reference. The boxed object includes a full object header with an MT pointer. - Unboxing is the reverse.
- These are expensive operations due to heap allocations, data copying, and increased GC pressure, and should be avoided in hot code paths, typically by using generics.
- Boxing converts a value type to an
- Scope vs. Lifetime: Scope is a compile-time concept determining variable visibility. Lifetime is a runtime concept determining how long memory persists. Stack-allocated data has deterministic lifetime; heap-allocated objects have non-deterministic lifetime managed by the GC based on reachability.
- Default Values: Fields and array elements are automatically initialized to
0,false,null, etc. Local variables must be explicitly assigned before use. Thedefaultkeyword (default(T)ordefault) provides a type-safe way to obtain these default values, especially useful in generics.
4. Memory Management and Garbage Collection
In the realm of modern programming languages, automatic memory management has become a cornerstone, liberating developers from the error-prone complexities of manual memory allocation and deallocation. C# and .NET leverage a sophisticated Garbage Collector (GC) to handle memory, significantly enhancing developer productivity and reducing common bugs like memory leaks and dangling pointers. However, mastering C# at an expert level necessitates a deep understanding of how this automatic system works, its nuances, and how to interact with it effectively to build high-performance, robust applications.
This chapter will delve into the intricacies of the .NET Garbage Collector, exploring its generational approach, the specialized Large Object Heap, strategies for deterministic resource cleanup, advanced GC modes, and the role of weak references.
4.1. The .NET Generational Garbage Collector
The .NET GC is a tracing garbage collector, meaning it periodically identifies and reclaims memory occupied by objects that are no longer “reachable” by the application, but it doesn’t keep explicit reference counts (e.g. like Python). This process is automatic, but understanding its mechanics is crucial for diagnosing performance issues and writing GC-friendly code.
For a foundational understanding, consult the Fundamentals of Garbage Collection on Microsoft Learn.
Why a Garbage Collector?
Historically, languages such as C and C++ required developers to explicitly manage memory through functions like malloc/free or new/delete. This manual approach, while offering ultimate control, introduced a plethora of common and difficult-to-diagnose bugs:
- Memory Leaks: Forgetting to free allocated memory, leading to a gradual depletion of available RAM and potential application crashes or system instability.
- Dangling Pointers: Accessing memory after it has been freed, which can result in unpredictable behavior, data corruption, or security vulnerabilities.
- Double-Free Errors: Attempting to free the same block of memory twice, typically leading to crashes or heap corruption.
- Use-After-Free Vulnerabilities: A specific type of dangling pointer bug where an attacker can exploit freed memory.
The GC abstracts these complexities away, allowing developers to focus on application logic rather than memory management.
The Generational Hypothesis: The Strategy for Efficiency
The cornerstone of the .NET GC’s efficiency is the Generational Hypothesis. This empirically derived principle dictates that:
- Most objects are short-lived: A significant majority of newly created objects (e.g., local variables, temporary strings, loop iterators, intermediate results) become unreachable very quickly after their creation.
- The older an object is, the longer it is likely to live: Objects that survive initial collections tend to be part of the application’s long-term state and are likely to persist for a considerable duration.
This hypothesis directly informs the GC’s strategy: it’s more efficient to perform frequent, small collections on “young” objects (where most garbage resides) than to constantly scan the entire heap for dead objects.
The Managed Heap
The managed heap is the region of memory where reference type objects are allocated by the CLR. Crucially, the managed heap is not typically a single, giant, contiguous block of virtual memory. Instead, it is composed of one or more segments.
- What is a Segment? A segment is a contiguous chunk of virtual memory that the CLR requests from the operating system. These segments are usually of a fixed size, for example, 16MB for 64-bit Workstation GC, or larger for Server GC.
- Dynamic Growth: The CLR acquires new segments from the operating system as the managed heap needs to grow. This dynamic allocation allows the heap to expand only as much as necessary, rather than reserving a massive chunk of memory upfront.
- Organization: The segments collectively form the logical managed heap, and the garbage collector organizes and manages objects within and across these segments.
Generations 0, 1, and 2
The .NET GC divides the managed heap into three distinct generations to leverage the generational hypothesis:
-
Generation 0 (Gen 0):
- Purpose: This is where all newly allocated objects (reference types) are initially placed.
- Location: Gen 0 always resides at the ends of the segments.
- Size: Gen 0 is relatively small compared to other generations.
- Collection Frequency: Collected very frequently. When Gen 0 fills up, a Gen 0 collection is triggered. This is the fastest and most common type of GC, as it only needs to scan a small portion of the heap.
- Survival (Promotion): Objects that are still reachable after a Gen 0 collection are “promoted” to Generation 1. This involves moving their data to the Gen 1 area.
-
Generation 1 (Gen 1):
- Purpose: Holds objects that survived one Gen 0 collection. These are slightly longer-lived than typical Gen 0 objects but are still considered relatively young.
- Location: Gen 1 typically shares space within the ephemeral segment with Gen 0, or occupies the next older segment.
- Size: Larger than Gen 0, but smaller than Gen 2.
- Collection Frequency: Collected less frequently than Gen 0. A Gen 1 collection occurs when Gen 1 fills up, or if a Gen 0 collection fails to free enough memory.
- Survival (Promotion): Objects that survive a Gen 1 collection are promoted to Generation 2.
-
Generation 2 (Gen 2):
- Purpose: Contains long-lived objects that have survived multiple collections (from Gen 1), as well as all objects allocated on the Large Object Heap (LOH).
- Location: Gen 2 typically occupies the oldest segments of the heap. As Gen 2 grows due to promotions, the CLR may acquire new segments specifically for Gen 2, adding them to the collection of segments managed by the GC.
- Size: Largest generation.
- Collection Frequency: Collected least frequently. A Gen 2 collection (often referred to as a “full GC”) is the most expensive, as it involves scanning the entire managed heap across all segments. It occurs when Gen 2 fills up, or when available memory is critically low, or occasionally by GC heuristics.
- Survival: Objects in Gen 2 generally remain there for a significant portion of the application’s lifetime, being collected only when they become truly unreachable.
This generational design significantly improves GC performance. By concentrating collection efforts on the youngest generation (where most dead objects are), the GC avoids the overhead of constantly scanning the entire, potentially massive, heap.
Object Allocation
When you create a new instance of a reference type using the new operator (e.g., new MyClass()), the allocation process is incredibly fast. The CLR manages a simple allocation pointer, which tracks the “end” of the current Gen 0 segment.
+-------------------------------------------------------------------------+
|                  Managed Heap (Conceptual View)                         |
+-------------------------------------------------------------------------+
| Segment 1 (Acquired First)       Segment 2 (Acquired Later)        ...  |
| +-------------------------+      +--------------------------+           |
| | Gen 2 Objects           |      | Gen 2 Objects            |           |
| | Gen 1 Objects           |      | Gen 1 Objects            |           |
| | Gen 0 Objects           |      | Gen 0 Objects (New Alloc)| <-- Allocation Pointer
| +-------------------------+      +--------------------------+           |
+-------------------------------------------------------------------------+
- Speed: New objects are almost always allocated into Generation 0 (the youngest generation) by simply moving this pointer forward. This is akin to allocating memory on the stack: it’s a simple pointer increment, as Generation 0 is designed to be a completely contiguous block of free space at the “end” of the current managed segment.
- Contiguous Free Space: This efficient allocation relies on the fact that the garbage collector keeps Generation 0 free of fragmentation, ensuring there’s always a clean, contiguous block of memory ready for new objects.
- Segment Boundary: When the current segment is full (or the available space for Gen 0 is exhausted), a garbage collection is triggered, or a new segment might be acquired from the OS to continue allocations.
The Mark-and-Compact Algorithm
The core algorithm used by the .NET GC to reclaim memory and manage fragmentation is a variant of the mark-and-compact algorithm (though modern GCs often employ sophisticated concurrent and background phases, the principles remain).
-
Mark Phase:
- The GC identifies all “roots” of the object graph. Roots are starting points from which objects can be reached, effectively defining what is “live.” These include:
- Static fields (references held by static variables).
- Stack variables (references held by local variables and method parameters on thread stacks).
- CPU registers (references held by CPU registers).
- GC Handles (explicitly created references for interop, pinning, etc.).
- The Finalization Queue (references to objects awaiting finalization).
- Starting from these roots, the GC recursively traverses the graph of objects, marking every object it encounters as “reachable” (or “live”).
- Any object not marked as reachable after this phase is considered “unreachable” (or “dead”) and is eligible for collection.
- The GC identifies all “roots” of the object graph. Roots are starting points from which objects can be reached, effectively defining what is “live.” These include:
-
Relocate/Compact Phase:
- After identifying live objects within a segment, the GC then moves these live objects to contiguous blocks within that segment (or sometimes to a younger segment during promotion).
- Eliminates Fragmentation: By relocating live objects side-by-side, compaction effectively removes the “holes” (free memory regions) left by dead objects, consolidating all available free space into one large, contiguous block at the end of the segment.
- Faster Future Allocations: This contiguous free space is essential for the highly efficient, pointer-increment-based allocation for new Gen 0 objects.
- Updates References: As objects are moved, the GC automatically updates all references (pointers) to these moved objects throughout the entire object graph (on the stack, in CPU registers, and within other heap objects) to point to their new locations.
- Segment Management and Compaction: While compaction primarily occurs within individual segments to maintain their contiguity, a full Gen 2 GC can involve more complex movements between segments, especially when promoting objects or when aiming to reclaim entire unused segments. The goal is always to consolidate free space and maintain allocation speed.
-
Sweep Phase (Conceptual):
- The memory regions previously occupied by dead objects, now empty due to compaction, are implicitly made available for new allocations. This is often integrated into the compaction process.
       Segment Before GC (Fragmented)
+---+---+---+---+---+---+---+---+---+   (A,B,C,D,E = Live; X,Y,Z,W = Dead)
| A | X | B | Y | C | Z | D | W | E |
+---+---+---+---+---+---+---+---+---+
  ^ Mark Phase: Identify A,B,C,D,E as live

       Segment After GC (Compacted)
+---+---+---+---+---+---------------+
| A | B | C | D | E |               |   (Live objects moved to front within the segment)
+---+---+---+---+---+---------------+
                          ^ Contiguous Free space for new allocations (Gen 0)
GC Triggers
Garbage collections are triggered by various factors, primarily:
- Generation 0 Full: The most common trigger. When the allocation pointer in Gen 0 reaches the end of its available space within the current segment, a Gen 0 collection is initiated.
- Memory Pressure: If the system reports low available memory, the GC might trigger a collection (potentially a full Gen 2 collection) to free up resources.
- Explicit Calls (
GC.Collect()): While possible, explicitly callingGC.Collect()is almost universally discouraged in production code. The GC’s sophisticated heuristics are usually far better at determining the optimal time for collection than manual intervention. Manual calls can disrupt these heuristics, leading to less efficient overall memory management and potentially introducing performance bottlenecks due to unexpected pauses.
4.2. The Large Object Heap (LOH)
While the generational GC effectively compacts memory for small and medium-sized objects, moving very large objects during compaction would be prohibitively expensive due to the sheer volume of data being copied. To address this, the .NET CLR introduced the Large Object Heap (LOH).
Refer to the Large Object Heap (LOH) documentation on Microsoft Learn.
Understanding LOH Allocation
- Threshold: Objects greater than or equal to 85,000 bytes (83 KB) are allocated on the LOH. Common examples include large arrays (e.g.,
int[],double[]) and large strings (though strings are immutable, forming a new large string often involves LOH). - No Compaction (Historically): Traditionally, the LOH was not compacted. Once a large object was allocated, it stayed at its memory address within its segment. When a large object died, its memory was simply marked as free, creating a “hole” in that LOH segment.
-
Fragmentation Problem: Because the LOH typically doesn’t compact (or historically, didn’t at all), it’s highly susceptible to fragmentation. As large objects of varying sizes die, they leave gaps of different sizes within the LOH segments. If a new large object needs to be allocated, it might not find a contiguous free block large enough, even if the total free memory on the LOH is sufficient across all segments. This can lead to
OutOfMemoryExceptioneven when physical memory is plentiful.LOH (Fragmented) - within a single LOH segment +-----------+---------+-----------+-----------+---------+ | Object A | Free | Object B | Free | Object C| | (100KB) | (50KB) | (120KB) | (80KB) | (90KB) | +-----------+---------+-----------+-----------+---------+ // there is a total of 50KB + 80KB = 130KB free space, // but if a new 100KB object needs to be allocated, it won't fit - LOH Collection: LOH collections occur only during Generation 2 collections. This means that dead large objects might persist in memory for a longer time before being reclaimed, exacerbating fragmentation within their LOH segments.
Modern LOH Improvements (.NET 7+)
With .NET 7 and later, significant improvements have been made to the LOH and compaction, mitigating some of the historical fragmentation issues:
- LOH Compaction: The LOH is now eligible for compaction during a full (Gen 2) GC, though it’s not compacted by default every time. This means that, when certain conditions are met, the GC can compact live objects within LOH segments to reduce fragmentation. You can influence this behavior via
GCSettings.LargeObjectHeapCompactionMode. - Pinned Object Heap (POH): Objects that must be fixed in memory (e.g., for native interop or
fixedstatements) are allocated on the POH, a separate heap that is never compacted. This prevents pinning from interfering with the compaction of other objects on the regular heap, as well as the LOH. - Non-LOH objects eligible for compaction: Even objects smaller than the LOH threshold can sometimes be allocated in segments that don’t get compacted, for example, if they are pinned. Modern GC aims to reduce pinning overhead on compaction where possible.
These improvements mitigate some of the historical pain points of LOH fragmentation.
Mitigating LOH Impact
Despite improvements, being mindful of LOH allocations remains important for performance:
-
Object Pooling (e.g.,
ArrayPool<T>): Instead of allocating new large arrays repeatedly, useArrayPool<T>.Sharedto rent and return arrays. This significantly reduces LOH allocation and GC pressure.using System.Buffers; byte[] buffer = ArrayPool<byte>.Shared.Rent(100_000); // Rents a buffer from the pool try { // Use the buffer } finally { ArrayPool<byte>.Shared.Return(buffer); // Return to the pool for reuse } Span<T>andMemory<T>: These types (introduced in C# 7.2) allow you to work with segments of memory (including large arrays) without creating new copies or allocations, thereby reducing the need for new large objects and minimizing LOH pressure.- Immutable Strings: Remember that
stringoperations often create new strings. For extensive string manipulation, useStringBuilderto reduce intermediate string allocations.
4.3. Finalization and IDisposable
The Garbage Collector effectively manages managed memory (memory allocated by the CLR for C# objects). However, applications often interact with unmanaged resources, which the GC cannot directly manage. Examples include:
- File handles (
FileStream) - Network sockets (
Socket) - Database connections (
SqlConnection) - Graphics handles (GDI+, DirectX)
- Native memory buffers (allocated via
Marshal.AllocHGlobal)
Failure to release these unmanaged resources deterministically can lead to resource leaks (e.g., too many open files, exhausted socket pool) even if managed memory is being cleaned up correctly. C# provides two mechanisms for resource cleanup: Finalizers (non-deterministic) and IDisposable (deterministic).
Non-Deterministic Finalization (Finalizers)
A finalizer (historically called a destructor in C++, often misrepresented as such in C# context) is a special method defined using a tilde (~) before the class name (e.g., ~MyClass()).
-
How it Works:
- When an object with a finalizer is created, the CLR adds a reference to it to a special internal list called the finalization queue.
- When the GC determines that an object with a finalizer is no longer reachable, it does not immediately reclaim its memory. Instead, it moves the object to another internal queue called
freachable(finalization-reachable queue). - A dedicated finalizer thread (run by the CLR) periodically processes the
freachablequeue, executing each object’s finalizer method. - Only after the finalizer has successfully run can the object’s memory be reclaimed by a subsequent GC collection cycle.
-
Drawbacks and Why They Are Discouraged:
- Non-Deterministic: You have no control over when a finalizer will run. It could be seconds, minutes, or never (if the application terminates abruptly before GC runs). This means unmanaged resources could be held for an unacceptably long time.
- Performance Overhead: Objects with finalizers are more expensive for the GC to manage. They effectively survive at least one extra GC collection to allow their finalizer to run, and the finalizer thread’s work can introduce overhead.
- Order Not Guaranteed: The order in which finalizers run is not guaranteed, even for related objects. This makes it dangerous to rely on finalizers to clean up dependent resources.
- Can Block GC: A slow or buggy finalizer can block the finalizer thread, potentially stalling the GC process and leading to memory pressure.
- Anti-pattern for Most Cases: Due to these issues, finalizers are almost universally discouraged as a primary cleanup mechanism for application code. They are generally only used in base classes by framework developers as a last-resort safeguard against resource leaks if
IDisposableis not used correctly.
// Example (Don't do this for primary cleanup!)
class MyResourceHolder
{
    private IntPtr _unmanagedBuffer; // Example of unmanaged resource

    public MyResourceHolder()
    {
        _unmanagedBuffer = System.Runtime.InteropServices.Marshal.AllocHGlobal(1024);
        Console.WriteLine("MyResourceHolder created, unmanaged buffer allocated.");
    }

    // Finalizer (called non-deterministically by GC)
    ~MyResourceHolder()
    {
        Console.WriteLine("Finalizer running for MyResourceHolder.");
        System.Runtime.InteropServices.Marshal.FreeHGlobal(_unmanagedBuffer);
        Console.WriteLine("Unmanaged buffer freed by finalizer.");
    }
}
Deterministic Cleanup (IDisposable)
The System.IDisposable interface provides the standard, deterministic way to release unmanaged resources and clean up other managed resources.
IDisposableInterface: It defines a single method:void Dispose().public interface IDisposable { void Dispose(); }- The
Dispose()Method: This method should contain all the logic necessary to release unmanaged resources (e.g., close files, free native memory) and optionally release large managed resources. - Manual Invocation: The key is that
Dispose()is meant to be called explicitly by the developer when they are finished with the resource. This provides deterministic cleanup – you know exactly when the resource is released. - The Dispose Pattern: For classes that own both managed and unmanaged resources, the standard “Dispose pattern” is recommended to prevent resource leaks and avoid double-disposal. This involves:
- Implementing
IDisposable. - Providing a
protected virtual void Dispose(bool disposing)method. - The
Dispose()method callsDispose(true)andGC.SuppressFinalize(this). - If a finalizer is present, it calls
Dispose(false).
- Implementing
public class ManagedAndUnmanagedResource : IDisposable
{
    private bool _disposed = false;
    private System.IO.FileStream _fileStream; // Managed resource
    private IntPtr _nativeBuffer;             // Unmanaged resource

    public ManagedAndUnmanagedResource(string filePath)
    {
        _fileStream = new System.IO.FileStream(filePath, System.IO.FileMode.Create);
        _nativeBuffer = System.Runtime.InteropServices.Marshal.AllocHGlobal(1024);
        Console.WriteLine("Resource created: File and Native Buffer allocated.");
    }

    // Public method for explicit deterministic cleanup
    public void Dispose()
    {
        Dispose(true); // Call the protected method, indicating explicit disposal
        GC.SuppressFinalize(this); // Tell the GC not to call the finalizer
        Console.WriteLine("Dispose() called explicitly. Suppressing finalizer.");
    }

    // Finalizer (present only if there's an unmanaged resource and Dispose might not be called)
    ~ManagedAndUnmanagedResource()
    {
        Console.WriteLine("Finalizer running (Dispose() was not called).");
        Dispose(false); // Call the protected method, indicating disposal via finalizer
    }

    // The core cleanup logic
    protected virtual void Dispose(bool disposing)
    {
        if (_disposed) {
            return; // Already disposed
        }

        _disposed = true;

        if (disposing)
        {
            // Clean up managed resources here
            _fileStream?.Dispose(); // Dispose managed object
            Console.WriteLine("Managed resource (FileStream) disposed.");
        }

        // Clean up unmanaged resources here (regardless of 'disposing' value)
        if (_nativeBuffer != IntPtr.Zero)
        {
            System.Runtime.InteropServices.Marshal.FreeHGlobal(_nativeBuffer);
            _nativeBuffer = IntPtr.Zero;
            Console.WriteLine("Unmanaged resource (Native Buffer) freed.");
        }
    }
}
using Statements and using Declarations
To simplify the deterministic disposal pattern, C# provides the using statement and using declarations (C# 8+). These constructs guarantee that Dispose() is called on an IDisposable object when the using block is exited, even if an exception occurs.
-
usingStatement (Traditional):// C# 7 and earlier using (var resource = new ManagedAndUnmanagedResource("log.txt")) { // Use the resource Console.WriteLine("Using the resource..."); } // resource.Dispose() is called automatically here Console.WriteLine("Resource disposed via using statement.");This is compiled into a
try-finallyblock that ensuresDispose()is called. -
usingDeclaration (C# 8.0+): This provides a more concise syntax forusingstatements, particularly useful when chaining multiple disposables or when the resource is used throughout a method. The resource is disposed at the end of the scope in which it is declared.// C# 8 and later void ProcessFile(string path) { using ManagedAndUnmanagedResource resource1 = new ManagedAndUnmanagedResource(path); using System.IO.StreamReader reader = new System.IO.StreamReader(resource1._fileStream); // Accessing for demo // Use resource1 and reader Console.WriteLine("Using declarations in scope..."); } // Both resource1.Dispose() and reader.Dispose() are called automatically here Console.WriteLine("Resources disposed via using declarations.");
IAsyncDisposable and await using (C# 8.0+)
For scenarios where resource disposal involves asynchronous operations (e.g., closing a network connection that requires asynchronous flushing), C# 8.0 introduced System.IAsyncDisposable and the await using construct.
IAsyncDisposableInterface: Defines a single asynchronous method:ValueTask DisposeAsync().public interface IAsyncDisposable { ValueTask DisposeAsync(); }-
await using: Similar tousing, but it awaits theDisposeAsync()method.public class AsyncResource : IAsyncDisposable { public async ValueTask DisposeAsync() { Console.WriteLine("Simulating async cleanup..."); await Task.Delay(100); // Simulate async work Console.WriteLine("Async cleanup complete."); } } async Task UseAsyncResource() { await using var resource = new AsyncResource(); Console.WriteLine("Using async resource..."); } // resource.DisposeAsync() is awaited hereThis is essential for robust asynchronous resource management without blocking threads.
Debate Simulation: Finalizers vs. IDisposable
- Argument for Finalizers: “They’re automatic! I don’t have to remember to call
Dispose().” - Counter-argument for Finalizers: “Yes, but they’re non-deterministic. Your critical database connection might stay open for minutes, or your limited native memory might not be freed until the GC feels like it. This leads to resource exhaustion and unreliable behavior. They also add GC overhead.”
- Argument for
IDisposable: “I have explicit control. I know exactly when my resources are released. Theusingstatement makes it easy and safe.” - Counter-argument for
IDisposable: “It requires manual intervention. What if I forget to put an object in ausingblock or callDispose()? Resource leaks!” - Conclusion: For application developers,
IDisposable(especially withusingconstructs) is overwhelmingly the preferred and recommended pattern for resource cleanup. Finalizers should only be considered as a last-resort safeguard in base classes that directly hold unmanaged resources, to prevent egregious leaks ifIDisposableis overlooked. They are a complex, low-level mechanism that can introduce more problems than they solve for typical application logic. Always implementIDisposablefor deterministic cleanup.
4.4. Weak References
A strong reference to an object prevents that object from being garbage collected. If objA holds a reference to objB, objB is reachable and will not be collected as long as objA is reachable. Sometimes, however, you need to refer to an object without prolonging its lifetime. This is where weak references come into play.
Refer to the WeakReference Class documentation on Microsoft Learn.
Understanding Weak References
A weak reference allows the GC to collect the referenced object even if the weak reference is the only remaining reference to it. If the object is collected, the weak reference becomes invalid.
C# provides the System.WeakReference (non-generic, older) and System.WeakReference<T> (generic, preferred for type safety) classes.
WeakReference<T>:- Constructor:
new WeakReference<T>(target)wheretargetis the object to which you want a weak reference. TryGetTarget(out T target): The primary way to use a weak reference. It attempts to retrieve the target object. It returnstrueif the object is still alive (not collected) and setstargetto the object. It returnsfalseif the object has been collected (or is about to be collected), andtargetwill bedefault(T).
- Constructor:
Common Use Cases
Weak references are useful in scenarios where you need to manage memory carefully, particularly for caching or avoiding circular references that could lead to memory leaks.
-
Caching: When building a cache, you want to store objects in memory for fast retrieval, but you don’t want the cache itself to prevent those objects from being collected if memory becomes scarce and they are no longer actively used elsewhere.
public class SimpleCache<TKey, TValue> where TValue : class { private readonly Dictionary<TKey, WeakReference<TValue>> _cache = new(); public void Add(TKey key, TValue value) { _cache[key] = new WeakReference<TValue>(value); } public TValue? Get(TKey key) { if (_cache.TryGetValue(key, out var weakRef)) { if (weakRef.TryGetTarget(out TValue? value)) { return value; // Object still alive } else { _cache.Remove(key); // Object collected, remove from cache } } return default; // Not found or already collected } } // Usage: var cache = new SimpleCache<int, byte[]>(); byte[] largeObject = new byte[1_000_000]; cache.Add(1, largeObject); largeObject = null; // Remove strong reference GC.Collect(); // Force collection (for demo, not production) GC.WaitForPendingFinalizers(); byte[]? retrieved = cache.Get(1); if (retrieved == null) { Console.WriteLine("Large object was collected."); } else { Console.WriteLine("Large object still in cache."); } // Expected Output: "Large object was collected." // Note: in debug mode, the object may not be collected immediately due to debugger's influence. -
Event Handling (Avoiding Memory Leaks): In some complex scenarios, if an event publisher lives longer than a subscriber, and the subscriber registers a strong reference, the subscriber might never be collected. Weak references can break this cycle.
// Caution: More complex in practice, often better solved with IDisposable or explicit unsubscription.
// This is for illustration of concept.
public class EventPublisher
{
    public event EventHandler MyEvent; // Strong reference to subscribers by default
}

public class EventSubscriber
{
    private WeakReference<EventPublisher> _publisherWeakRef;

    public EventSubscriber(EventPublisher publisher)
    {
        _publisherWeakRef = new WeakReference<EventPublisher>(publisher);
        publisher.MyEvent += HandleEvent; // This creates a strong reference by default
        // To make this truly weak, custom event subscription/unsubscription would be needed
        // that manually manages WeakReference to delegates. This is non-trivial.
    }

    private void HandleEvent(object? sender, EventArgs e)
    {
        // Event logic
    }
}
While
WeakReferencecan conceptually help here, implementing weak events correctly is tricky and often involves custom event handlers that storeWeakReferenceto the subscriber’s method target. For most cases, ensuring proper unsubscription (publisher.MyEvent -= HandleEvent;) is the more common and robust solution for event-related memory leaks.
Trade-offs of Weak References
nullChecks: You must always check if the target object is available usingTryGetTarget(), as it might have been collected.- Performance: Accessing objects via weak references is slightly slower than strong references due to the extra
TryGetTarget()call. - Not a Replacement for
IDisposable: Weak references do not manage unmanaged resources. They only affect whether an object’s managed memory is collected. For unmanaged resources,IDisposableis still paramount.
4.5. Advanced GC
While the .NET GC is largely automatic and self-tuning, understanding its advanced modes and settings can be crucial for optimizing high-performance applications, particularly server-side workloads.
For in-depth details on GC configurations, refer to GC Configuration Options on Microsoft Learn. For GC modes, see Workstation and Server GC.
GC Modes: Workstation vs. Server GC
The CLR offers two main GC modes, configured in the .runtimeconfig.json file or via environment variables:
-
Workstation GC (
"ServerGarbageCollection": false) - Default:- Purpose: Optimized for client-side applications (desktop apps, games) where responsiveness and minimal pause times are critical.
- Characteristics:
- Single Heap: All threads use a single managed heap.
- Concurrent (Default): Typically performs garbage collection concurrently with application threads, minimizing “stop-the-world” (STW) pauses.
- Runs on Triggering Thread: The GC work is performed on the thread that triggers the collection (e.g., due to allocation pressure).
- Lower Memory Footprint: Generally consumes less memory as it doesn’t duplicate per-CPU heap structures.
- Trade-off: May not scale as well on multi-core systems under heavy allocation pressure compared to Server GC.
-
Server GC (
"ServerGarbageCollection": true):- Purpose: Optimized for server-side applications (ASP.NET Core, microservices) where maximum throughput and scalability on multi-core systems are paramount, even if it means slightly longer, but less frequent, pauses.
- Characteristics:
- Multiple Heaps: Creates a separate managed heap and dedicated GC thread for each logical CPU core in the system.
- Concurrent (Default): Also performs collection concurrently, but with multiple dedicated GC threads working in parallel.
- Higher Memory Footprint: Each dedicated heap consumes memory, leading to generally higher overall memory usage.
- Higher Throughput: By parallelizing GC work, it can process more allocations and collections in a given time period, leading to better overall throughput for high-concurrency applications.
- Trade-off: Can sometimes introduce longer “stop-the-world” pauses (though less frequently) if non-concurrent phases (like root scanning or compaction of Gen 2) take longer due to the sheer size of the heaps.
Choosing the Mode:
- Workstation GC: Use for desktop applications, tools, or any scenario where user interface responsiveness is paramount, and the application is not primarily a server handling many concurrent requests.
- Server GC: Use for server applications (web servers, background services, microservices) running on multi-core machines with high throughput demands. The slight increase in memory footprint and potentially longer (but rarer) pauses are acceptable trade-offs for increased scalability and overall processing power.
Example .runtimeconfig.json for Server GC:
{
    "runtimeOptions": {
        "configProperties": {
            "System.GC.Server": true
        }
    }
}
Concurrent GC and Background GC
Modern .NET GCs (both Workstation and Server) are typically concurrent. This means the GC performs most of its work (especially marking) while your application threads are still running. This significantly reduces the “stop-the-world” (STW) pauses that were characteristic of older, non-concurrent collectors.
- Concurrent (Foreground) GC: Applies to Gen 0 and Gen 1 collections. These are very fast and involve minimal STW pauses.
- Background GC: This is the concurrent collection mechanism for Generation 2 (and LOH). When a background GC starts, application threads continue to run while the GC marks objects. There are still short STW pauses required at the beginning (for root scanning) and at the end (for compaction/relocation of objects), but the bulk of the work is concurrent. This is crucial for maintaining responsiveness in long-running applications.
Tuning GC Behavior with GCSettings
The System.Runtime.GCSettings class provides a limited set of properties to programmatically inspect and influence GC behavior. Direct manipulation of GC is generally discouraged as the GC is highly self-optimizing. However, for very specific performance-critical scenarios, these settings can be useful.
GCSettings.IsServerGC: Returnstrueif Server GC is enabled. (Read-only at runtime).GCSettings.LatencyMode: Allows you to hint to the GC about the desired balance between latency (responsiveness) and throughput.GCLatencyMode.Interactive: Default for Workstation GC. Balances responsiveness with throughput.GCLatencyMode.Batch: Prioritizes throughput over responsiveness. May incur longer pauses. Suitable for background processing.GCLatencyMode.LowLatency: Prioritizes extremely low pause times, even at the cost of more frequent (but shorter) collections and potentially higher memory usage. Can delay Gen 2 collections. This mode should be used with extreme caution and typically within atry-finallyblock to ensure it’s reverted.var oldMode = GCSettings.LatencyMode; try { GCSettings.LatencyMode = GCLatencyMode.LowLatency; // Critical, latency-sensitive code here } finally { GCSettings.LatencyMode = oldMode; // Revert to previous mode }
GCSettings.LargeObjectHeapCompactionMode: Controls LOH compaction.GCLargeObjectHeapCompactionMode.Default: LOH compaction occurs when a full GC is triggered, based on GC heuristics.GCLargeObjectHeapCompactionMode.CompactOnce: Forces a compaction of the LOH during the next full blocking GC. Useful for specific scenarios where you know the LOH is fragmented and you need to free up contiguous space. This is a one-time operation.
GC.Collect() and GC.WaitForPendingFinalizers()
While these methods exist, explicitly calling GC.Collect() is almost universally discouraged in production code.
-
Why Discouraged:
- Hindering GC Heuristics: The GC has sophisticated algorithms to determine the optimal time to collect based on allocation patterns and memory pressure. Manual calls disrupt these heuristics and can lead to less efficient overall memory management.
- Performance Bottlenecks: Forcing a collection can lead to unnecessary and potentially long “stop-the-world” pauses at inconvenient times, degrading user experience or server responsiveness.
- False Sense of Security: Calling
GC.Collect()doesn’t guarantee memory is immediately freed, especially for objects awaiting finalization or if they’re still reachable.
-
When Might They Be Used (Rarely):
- Testing/Profiling: For specific testing scenarios to force a collection and analyze memory usage with profiling tools.
- Resource-Critical Applications (Highly Specific): In extremely rare cases for memory-constrained embedded systems or games where developers have a precise understanding of memory usage patterns and can predict optimal collection points. Even then, it’s a high-risk optimization.
GC.WaitForPendingFinalizers(): Only relevant if you have finalizers. It pauses the current thread until all pending finalizers have completed. This is sometimes used in shutdown routines for unmanaged resources, but again, typically best avoided by relying onIDisposable.
Memory Profiling Tools
Diagnosing and optimizing GC-related performance issues requires specialized tools. Relying on intuition alone is often insufficient. Essential tools include:
- PerfView (Microsoft): A powerful, free, command-line and GUI tool for comprehensive performance analysis, including detailed GC events.
- dotMemory (JetBrains): A commercial memory profiler that provides intuitive visualizations of object graphs, allocations, and GC behavior.
- ANTS Memory Profiler (Redgate): Another popular commercial memory profiler offering deep insights into memory usage.
- Visual Studio Diagnostic Tools: The built-in Memory Usage tool in Visual Studio provides basic real-time memory and GC monitoring during debugging.
These tools allow you to identify large object allocations, excessive object churn, LOH fragmentation, and GC pause times, guiding your optimization efforts.
Key Takeaways
- Generational GC: The .NET GC is a tracing, generational collector that leverages the “generational hypothesis” (most objects die young) to optimize collection frequency across Generation 0 (new objects, frequent collection), Generation 1 (short-lived survivors), and Generation 2 (long-lived objects, infrequent full collection).
- Mark-and-Compact: The GC identifies reachable objects from “roots” (Mark phase) and then moves live objects to contiguous memory blocks (Relocate/Compact phase) to eliminate fragmentation and speed up future allocations.
- Large Object Heap (LOH): Objects ≥ 85KB are allocated on the LOH. Historically not compacted, leading to fragmentation. Modern .NET versions (7+) can compact the LOH and use a separate POH for pinned objects. Use
ArrayPool<T>andSpan<T>to mitigate LOH issues. - Deterministic vs. Non-Deterministic Cleanup:
- Finalizers (
~ClassName()): Non-deterministic, run by GC thread later. Used as a last-resort safeguard for unmanaged resources but are costly, non-guaranteed, and generally discouraged in application code. IDisposable: The primary mechanism for deterministic cleanup of unmanaged and managed resources. TheDispose()method is called explicitly.usingStatement/Declaration: Syntactic sugar fortry-finallyblocks that guaranteeDispose()is called onIDisposableobjects.IAsyncDisposable/await using(C# 8+): For asynchronous resource cleanup.
- Finalizers (
- Weak References:
WeakReference<T>allows referencing an object without preventing its garbage collection. Useful for caching or breaking reference cycles, but requiresTryGetTarget()checks. - Advanced GC Modes:
- Workstation GC (Default): Optimized for client responsiveness, single heap, concurrent.
- Server GC: Optimized for server throughput on multi-core machines, multiple heaps per CPU, concurrent, scales better but higher memory usage.
GCSettings: Allows limited programmatic control over GC behavior (e.g.,LatencyMode), but explicitGC.Collect()is almost always detrimental to overall performance.
- Memory Profiling: Essential tools (PerfView, dotMemory) are required to diagnose and optimize GC-related performance issues effectively.
5. Assemblies, Type Loading, and Metadata
At the heart of the .NET ecosystem lies a robust system for packaging, deploying, and executing code. This system relies heavily on the concepts of assemblies, type loading, and metadata. Understanding how these components interact is fundamental for any expert C# developer, enabling them to troubleshoot deployment issues, optimize application startup, leverage dynamic programming techniques, and build extensible frameworks. This chapter will dissect these core mechanisms, from the static structure of assemblies to the dynamic introspection capabilities of reflection and the declarative power of attributes.
5.1. Assembly Loading
Assemblies are the fundamental units of deployment, versioning, reuse, activation, and security in .NET. They are self-describing archives (typically .dll or .exe files) that contain Common Intermediate Language (CIL or IL) code, metadata, and optional resources. When your C# application runs, the Common Language Runtime (CLR) needs to locate, load, and prepare these assemblies for execution.
For detailed information on assemblies and their structure, refer to the Assemblies in .NET documentation on Microsoft Learn.
How the CLR Resolves, Locates, and Loads Assemblies
The process of bringing an assembly into memory for execution involves several steps:
-
Resolution: When your running code (e.g.,
Mainmethod in an executable) references a type that resides in an assembly not yet loaded into the current application domain (orAssemblyLoadContext), the CLR must resolve the assembly’s identity. This involves looking at the referenced assembly’s simple name, version, culture, and public key token (for strong-named assemblies). -
Location (Probing): Once the CLR knows what assembly it needs, it embarks on a process called probing to locate the assembly file on disk. The CLR searches in a specific order of locations:
- Application Base Directory: The directory where the main executable for the application resides.
- Private Path: Subdirectories specified in the application’s configuration file (e.g.,
<probing privatePath="bin;lib"/>in.configfiles, or implicitly handled by.deps.jsonin .NET Core/5+). - Global Assembly Cache (GAC): (Primarily for .NET Framework, less relevant for .NET Core/5+ applications which are typically self-contained or NuGet-driven). The GAC is a machine-wide shared repository for strongly-named assemblies. If an assembly is found in the GAC, it bypasses other probing paths.
- Codebase (for older scenarios): A URL specified in the config file, indicating where to download the assembly (rarely used in modern .NET).
The probing process is a sequential search. The first assembly found that matches the requested identity is loaded. If no matching assembly is found after exhausting all paths, a
FileNotFoundExceptionorFileLoadExceptionis thrown. -
Loading: Once the assembly file is located, the CLR performs the following:
- Loads the PE file: The Portable Executable (PE) file (which contains the IL) is loaded into memory.
- Parses the Manifest: The assembly’s manifest (a part of its metadata) is read. The manifest contains crucial information like the assembly’s identity, a list of all files in the assembly, a list of referenced assemblies, exported types, and security permissions.
- Verification: The IL code might undergo security and type safety verification.
- JIT Compilation (Just-In-Time): Only when methods within the assembly are actually called for the first time is their IL code Just-In-Time (JIT) compiled into native machine code. This is a form of lazy loading and execution.
The Role of AssemblyLoadContext for Isolation
In traditional .NET Framework, assembly loading could lead to “DLL Hell” – conflicts arising when different components or plugins within the same application required different, incompatible versions of the same assembly. All assemblies were loaded into a single “AppDomain,” making isolation difficult.
.NET Core and .NET 5+ introduced System.Runtime.Loader.AssemblyLoadContext as the primary mechanism for loading and managing assemblies. This class provides a powerful solution for isolating assembly dependencies, enabling scenarios like plugin architectures, runtime code generation, and hot-reloading without version conflicts.
For comprehensive documentation on AssemblyLoadContext, see the Microsoft learn documentation.
- Isolation by Design: Each
AssemblyLoadContextrepresents an isolated environment for loading assemblies. Assemblies loaded into one context are generally isolated from assemblies loaded into other contexts. - Default Context: Every .NET application starts with a single, default
AssemblyLoadContext.Default. This context handles loading the application’s main assemblies and their direct dependencies. - Custom Contexts: Developers can create custom
AssemblyLoadContextinstances to load specific sets of assemblies into isolated environments. This is particularly useful for:- Plugin Architectures: Each plugin can be loaded into its own
AssemblyLoadContext, allowing plugins to use different versions of shared libraries without conflicting with each other or the host application. - Hot-Reloading: An
AssemblyLoadContextcan be unloaded, allowing its contained assemblies to be completely released from memory. This enables scenarios where you can replace components at runtime without restarting the entire application. - Dependency Conflict Resolution: If two parts of your application require conflicting versions of a dependency, each can load its dependencies within its own
AssemblyLoadContext.
- Plugin Architectures: Each plugin can be loaded into its own
Example: Basic Custom AssemblyLoadContext
using System.Reflection;
using System.Runtime.Loader;

public class PluginLoadContext : AssemblyLoadContext
{
    private string _pluginPath;

    public PluginLoadContext(string pluginPath) : base(isCollectible: true) // Mark as collectible for unloading
    {
        _pluginPath = pluginPath;
    }

    // Override the Load method to specify how this context resolves assemblies
    protected override Assembly? Load(AssemblyName assemblyName)
    {
        string assemblyFilePath = Path.Combine(_pluginPath, assemblyName.Name + ".dll");
        if (File.Exists(assemblyFilePath))
        {
            // Load the assembly from the plugin's directory
            Console.WriteLine($"Loading assembly '{assemblyName.Name}' from plugin path: {assemblyFilePath}");
            return LoadFromAssemblyPath(assemblyFilePath);
        }

        // Defer to the parent context (typically Default) if not found in plugin path
        // This handles shared framework assemblies (e.g., System.Runtime)
        return null; // Returning null means defer to parent context(s)
    }

    // You might also override LoadUnmanagedDll for native libraries
    protected override IntPtr LoadUnmanagedDll(string unmanagedDllName, IntPtr assemblyContext)
    {
        string unmanagedDllFilePath = Path.Combine(_pluginPath, unmanagedDllName);
        if (File.Exists(unmanagedDllFilePath))
        {
            Console.WriteLine($"Loading unmanaged DLL '{unmanagedDllName}' from plugin path: {unmanagedDllFilePath}");
            return LoadUnmanagedDllFromPath(unmanagedDllFilePath);
        }
        return IntPtr.Zero; // Defer to parent
    }
}

public interface IPlugin
{
    void Run();
}

// Example usage
public class AssemblyLoadingDemo
{
    public static void Run()
    {
        Console.WriteLine("--- DefaultLoadContext ---");
        Assembly currentAssembly = Assembly.GetExecutingAssembly();
        Console.WriteLine($"Current Assembly: {currentAssembly.FullName}");
        Console.WriteLine($"Context for current Assembly: {AssemblyLoadContext.GetLoadContext(currentAssembly)?.Name}");

        // Simulate a plugin scenario
        string pluginDirectory = Path.Combine(AppContext.BaseDirectory, "Plugins", "MyPlugin");
        Directory.CreateDirectory(pluginDirectory); // Ensure directory exists
        // In a real scenario, you'd copy plugin DLLs here.
        // For demonstration, let's just create a dummy file.
        File.WriteAllText(Path.Combine(pluginDirectory, "MyPlugin.dll"), "Dummy Plugin DLL Content");

        Console.WriteLine("\n--- Custom PluginLoadContext ---");
        PluginLoadContext pluginContext = new PluginLoadContext(pluginDirectory);
        try
        {
            // Load an assembly (e.g., MyPlugin.dll) into the custom context
            // Note: For a real plugin, you'd load the actual plugin assembly
            // and then discover types implementing IPlugin.
            Assembly pluginAssembly = pluginContext.LoadFromAssemblyName(new AssemblyName("MyPlugin"));
            Console.WriteLine($"Plugin Assembly: {pluginAssembly.FullName}");
            Console.WriteLine($"Context for Plugin Assembly: {AssemblyLoadContext.GetLoadContext(pluginAssembly)?.Name}");

            // The 'Run' method below won't actually execute plugin code,
            // as "MyPlugin.dll" is a dummy. This is conceptual.
            // In a real app, you'd use reflection to create an instance and call IPlugin.Run().
        }
        catch (FileNotFoundException ex)
        {
            Console.WriteLine($"Error loading plugin assembly: {ex.Message}. (This is expected for dummy file).");
        }
        finally
        {
            // Unload the context and its assemblies (only if isCollectible: true)
            pluginContext.Unload();
            Console.WriteLine("\nPluginLoadContext unloaded. Assemblies should be garbage collected.");
            GC.Collect(); // Force GC for demo
            GC.WaitForPendingFinalizers();
            // After unload, trying to access types from pluginAssembly would fail.
        }
    }
}

// Call from your Main method:
// AssemblyLoadingDemo.Run();
Parent-First vs. Self-First Loading:
By default, AssemblyLoadContext implements a parent-first loading strategy. When an assembly is requested within a custom context:
- The custom context first tries to load the assembly from its parent context (usually
AssemblyLoadContext.Default). - If the parent succeeds, that assembly is used. This prevents multiple copies of the same framework assembly from being loaded.
- If the parent fails, then the custom context tries to load it from its own paths (e.g., plugin directory).
This “parent-first” approach is crucial for sharing common framework assemblies and preventing conflicts with the main application. You can customize this behavior by overriding Load as shown above, but deviating from parent-first requires careful consideration.
5.2. Organizing Code: Namespaces, File-Scoped Namespaces (C# 10), and Global Usings (C# 10)
While assemblies define the physical units of deployment and loading, namespaces provide a logical mechanism for organizing code within these assemblies. They are a purely compile-time construct, designed to prevent naming collisions and improve code readability and maintainability.
Namespaces as Logical Groupings
- Purpose: Namespaces group related types (classes, structs, interfaces, enums, delegates) under a unique hierarchical name. This allows multiple libraries to define types with the same simple name (e.g.,
Logger) without conflict, as long as they reside in different namespaces (e.g.,MyApp.Logging.Loggervs.ThirdParty.Logging.Logger). - Compile-Time Only: Namespaces have no direct runtime impact on performance or memory usage. They are stripped away during compilation, and the IL refers to types by their fully qualified names (e.g.,
System.Console). They serve solely as a convenience for developers and for the C# compiler to resolve type names. -
usingDirectives: Theusingdirective allows you to import types from a namespace, making them directly accessible without their fully qualified name.// Without using directive System.Console.WriteLine("Hello"); // With using directive using System; Console.WriteLine("Hello"); // Much cleanerYou can also create an alias:
using ProjectLogger = MyProject.Logging.Logger;
For more details, see Namespaces in C#.
File-Scoped Namespaces (C# 10)
Introduced in C# 10, file-scoped namespaces offer a more concise syntax for declaring a namespace for all types within a single file.
- Problem Solved: Traditional namespace declarations require an extra level of indentation for all code within the file, which can add unnecessary visual clutter, especially in files with deep logical nesting.
-
Syntax:
// Old way (nested) namespace MyProject.Data { public class UserRepository { /* ... */ } public class ProductRepository { /* ... */ } } // C# 10 File-scoped namespace namespace MyProject.Data; // No curly braces public class UserRepository { /* ... */ } public class ProductRepository { /* ... */ } - Benefits:
- Conciseness: Reduces boilerplate and indentation, making code cleaner and easier to read.
- Reduced Nesting: Flattens the code structure visually.
- Limitations: A file can contain only one file-scoped namespace declaration. If you need multiple namespaces within a single file, you must use the traditional block-scoped syntax.
Global Usings (C# 10)
Also introduced in C# 10, global using directives allow you to import namespaces for an entire project, eliminating the need to add the same using directives to every single file.
- Problem Solved: Many projects repeatedly include the same
usingdirectives (e.g.,System,System.Collections.Generic,System.Linq) at the top of almost every C# file. This is redundant and adds visual noise. - Syntax: You declare a
global usingdirective in any C# file in your project (often in a dedicated file likeUsings.csor implicitly generated by the SDK):// In a file like GlobalUsings.cs or implicitly generated global using System; global using System.Collections.Generic; global using System.Linq; global using System.Net.Http; global using MyProject.Domain; // Example for your own common namespacesOnce declared, these namespaces are available to all C# files in the project without explicit
usingdirectives. - Integration with .NET SDK (
ImplicitUsings): Modern .NET SDKs (e.g., fornet6.0,net8.0) have anImplicitUsingsfeature enabled by default in new project templates. This automatically generatesglobal usingdirectives for a common set of namespaces based on the project type (e.g.,System,System.Linqfor console apps; more for web apps). This often makes manually declaringglobal usingdirectives for common namespaces unnecessary. You can disable or customize this behavior in your.csprojfile:<PropertyGroup> <ImplicitUsings>enable</ImplicitUsings> </PropertyGroup> - Benefits:
- Cleaner Code: Significantly reduces boilerplate at the top of individual source files.
- Centralized Management: Common imports can be managed in one place.
- Improved Readability: Files focus more on core logic.
5.3. Reflection and Metadata
Metadata is data about data. In .NET, metadata is intrinsic to every assembly and describes the types, members, and references within it. This metadata is stored alongside the IL code in the assembly’s PE file. It’s how the CLR knows the name of a class, its base type, its methods, their parameters, return types, and so on.
Reflection is the powerful capability within .NET that allows you to inspect this metadata at runtime, and even dynamically invoke members or create instances of types that were not known at compile time. The System.Reflection namespace provides the classes to achieve this.
For a comprehensive guide to reflection, see Reflection in .NET.
The System.Type Class: The Gateway to Metadata
The central class in reflection is System.Type. An instance of Type represents a type definition (e.g., a class, struct, interface, enum) at runtime.
- Obtaining a
Typeobject:typeof(T)operator: At compile time, if the type is known:Type intType = typeof(int); Type listType = typeof(List<string>);GetType()method: At runtime, from an object instance:string myString = "Hello"; Type stringType = myString.GetType();Type.GetType(string typeName)static method: At runtime, from a fully qualified type name (string):Type? consoleType = Type.GetType("System.Console"); Type? myClassType = Type.GetType("MyNamespace.MyClass, MyAssembly"); // Assembly qualified name
Once you have a Type object, you can query its metadata:
using System.Reflection;

Type intType = typeof(Int32);

Console.WriteLine($"Type Name: {intType.Name}");
Console.WriteLine($"Full Name: {intType.FullName}");
Console.WriteLine($"Namespace: {intType.Namespace}");
Console.WriteLine($"Is Class: {intType.IsClass}");
Console.WriteLine($"Base Type: {intType.BaseType?.FullName}");
Console.WriteLine("Methods:");

// Get all public methods
MethodInfo[] methods = intType.GetMethods(BindingFlags.Public | BindingFlags.Static | BindingFlags.Instance);
foreach (MethodInfo method in methods) {
    string parameters = string.Join(", ", method.GetParameters().Select(p => $"{p.ParameterType.Name} {p.Name}"));
    string isStatic = method.IsStatic ? "static" : "      ";
    Console.WriteLine($"  {isStatic} {method.ReturnType.Name} {method.Name}({parameters})");
}
Output on C# 13:
Type Name: Int32
Full Name: System.Int32
Namespace: System
Is Class: False
Base Type: System.ValueType
Methods:
  static Int64 BigMul(Int32 left, Int32 right)
         Int32 CompareTo(Object value)
         Int32 CompareTo(Int32 value)
         Boolean Equals(Object obj)
         Boolean Equals(Int32 obj)
         Int32 GetHashCode()
         String ToString()
         String ToString(String format)
         String ToString(IFormatProvider provider)
         String ToString(String format, IFormatProvider provider)
         Boolean TryFormat(Span`1 destination, Int32& charsWritten, ReadOnlySpan`1 format, IFormatProvider provider)
         Boolean TryFormat(Span`1 utf8Destination, Int32& bytesWritten, ReadOnlySpan`1 format, IFormatProvider provider)
  static Int32 Parse(String s)
  static Int32 Parse(String s, NumberStyles style)
  static Int32 Parse(String s, IFormatProvider provider)
  static Int32 Parse(String s, NumberStyles style, IFormatProvider provider)
  static Int32 Parse(ReadOnlySpan`1 s, NumberStyles style, IFormatProvider provider)
  static Boolean TryParse(String s, Int32& result)
  static Boolean TryParse(ReadOnlySpan`1 s, Int32& result)
  static Boolean TryParse(ReadOnlySpan`1 utf8Text, Int32& result)
  static Boolean TryParse(String s, NumberStyles style, IFormatProvider provider, Int32& result)
  static Boolean TryParse(ReadOnlySpan`1 s, NumberStyles style, IFormatProvider provider, Int32& result)
         TypeCode GetTypeCode()
  static ValueTuple`2 DivRem(Int32 left, Int32 right)
  static Int32 LeadingZeroCount(Int32 value)
  static Int32 PopCount(Int32 value)
  static Int32 RotateLeft(Int32 value, Int32 rotateAmount)
  static Int32 RotateRight(Int32 value, Int32 rotateAmount)
  static Int32 TrailingZeroCount(Int32 value)
  static Boolean IsPow2(Int32 value)
  static Int32 Log2(Int32 value)
  static Int32 Clamp(Int32 value, Int32 min, Int32 max)
  static Int32 CopySign(Int32 value, Int32 sign)
  static Int32 Max(Int32 x, Int32 y)
  static Int32 Min(Int32 x, Int32 y)
  static Int32 Sign(Int32 value)
  static Int32 Abs(Int32 value)
  static Int32 CreateChecked(TOther value)
  static Int32 CreateSaturating(TOther value)
  static Int32 CreateTruncating(TOther value)
  static Boolean IsEvenInteger(Int32 value)
  static Boolean IsNegative(Int32 value)
  static Boolean IsOddInteger(Int32 value)
  static Boolean IsPositive(Int32 value)
  static Int32 MaxMagnitude(Int32 x, Int32 y)
  static Int32 MinMagnitude(Int32 x, Int32 y)
  static Boolean TryParse(String s, IFormatProvider provider, Int32& result)
  static Int32 Parse(ReadOnlySpan`1 s, IFormatProvider provider)
  static Boolean TryParse(ReadOnlySpan`1 s, IFormatProvider provider, Int32& result)
  static Int32 Parse(ReadOnlySpan`1 utf8Text, NumberStyles style, IFormatProvider provider)
  static Boolean TryParse(ReadOnlySpan`1 utf8Text, NumberStyles style, IFormatProvider provider, Int32& result)
  static Int32 Parse(ReadOnlySpan`1 utf8Text, IFormatProvider provider)
  static Boolean TryParse(ReadOnlySpan`1 utf8Text, IFormatProvider provider, Int32& result)
         Type GetType()
Inspecting Members and Late Binding
System.Reflection provides a hierarchy of MemberInfo classes to represent different code elements:
MethodInfo: Represents a method.ParameterInfo: Represents a method parameter or return type.PropertyInfo: Represents a property.FieldInfo: Represents a field.ConstructorInfo: Represents a constructor.EventInfo: Represents an event.
You can retrieve these using Type.GetMembers(), Type.GetMethods(), Type.GetProperties(), MethodInfo.GetParameters(), etc., often with BindingFlags to filter for public, private, static, instance members, and so on.
Late Binding: Reflection allows you to invoke methods or access properties/fields at runtime, without knowing the type at compile time. This is known as late binding.
System.Activator: A class that provides methods to create instances of types at runtime.MethodInfo.Invoke(): Invokes a method on an instance of a type.ConstructorInfo.Invoke(): Create instances of types dynamically.PropertyInfo.GetValue(),PropertyInfo.SetValue(): Get or set property values dynamically.FieldInfo.GetValue(),FieldInfo.SetValue(): Get or set field values dynamically.
public class Calculator
{
    public int MyValue { get; set; } // Example property
    public int Add(int a, int b) => a + b;
    private string Greet(string name) => $"Hello, {name}!";
}

// ... in main
Type calculatorType = typeof(Calculator);
object? calculatorInstance = Activator.CreateInstance(calculatorType); // Create instance

// Invoke a public method
MethodInfo? addMethod = calculatorType.GetMethod("Add");
if (addMethod != null)
{
    object? result = addMethod.Invoke(calculatorInstance, new object[] { 5, 3 });
    Console.WriteLine($"Result of Add: {result}"); // Output: 8
}

// Invoke a private method (requires BindingFlags.NonPublic)
MethodInfo? greetMethod = calculatorType.GetMethod("Greet", BindingFlags.Instance | BindingFlags.NonPublic);
if (greetMethod != null)
{
    object? greeting = greetMethod.Invoke(calculatorInstance, new object[] { "World" });
    Console.WriteLine($"Result of Greet: {greeting}"); // Output: Hello, World!
}

// Access a property
PropertyInfo? myProperty = calculatorType.GetProperty("MyValue");
myProperty?.SetValue(calculatorInstance, 42);
object? propValue = myProperty?.GetValue(calculatorInstance);
Console.WriteLine($"MyValue: {propValue}");  // Output: 42
Performance Cost and Trade-offs
Reflection, while powerful, comes with a significant performance overhead compared to direct, compile-time bound calls.
- Why is it slow?
- Lookup Overhead: The CLR needs to search through metadata to find the requested type or member.
- JIT Compilation: Dynamically invoked methods still need to be JIT-compiled.
- Boxing/Unboxing: Value types passed to or returned from
Invokemethods are often boxed and unboxed, incurring additional overhead. - Security Checks: More rigorous security checks might be performed for reflective calls.
- Indirect Calls: The call path is longer and less optimized than a direct method call.
Debate Simulation: When to Use Reflection vs. Avoid It
- Argument for Using Reflection: “Reflection enables incredible flexibility and extensibility. I can build frameworks that work with types I don’t know at compile time (like ORMs, serializers, DI containers, or plugin systems). It allows for powerful runtime introspection and dynamic behavior.”
- Counter-argument for Using Reflection: “Yes, but it’s a performance killer. For core application logic or any hot path, the overhead is unacceptable. It also makes code harder to refactor (no compile-time checking of method names) and debug (runtime errors instead of compile-time). It’s a last resort for dynamic scenarios, not a general-purpose programming tool.”
- Conclusion: Reflection is a specialized, powerful tool.
- Use It When: Building frameworks, libraries, or tools where you must interact with arbitrary types or provide extensibility points that rely on runtime type discovery (e.g., custom serializers, deserializers, object-relational mappers (ORMs), dependency injection (DI) containers, plugin loaders, testing frameworks, code analyzers).
- Avoid It When: Performance is critical, for everyday application logic, or when you can achieve the same result with compile-time strong typing (e.g., interfaces, generics, virtual methods).
- Mitigation for Performance-Critical Reflection:
- Cache
TypeandMethodInfoobjects: Don’t repeatedly calltypeof()orGetMethod()in loops. Get them once and cache them. - Expression Trees: For repeated dynamic calls, convert reflection logic into compiled expression trees. These compile to IL at runtime and offer significantly better performance after the initial compilation cost.
System.Reflection.Emit: For extreme performance needs with repeated dynamic calls, generate IL directly (see next section).- Source Generators (C# 9+): Often a better compile-time alternative for scenarios that previously used reflection for boilerplate (e.g.,
ToString()implementations, DTO mapping).
- Cache
5.4. Dynamic Code Generation with System.Reflection.Emit
For scenarios requiring the ultimate in runtime dynamism and performance, .NET provides System.Reflection.Emit. This namespace allows you to programmatically generate Common Intermediate Language (IL) instructions at runtime, define new types, methods, and even entire assemblies in memory, and then execute them.
Refer to the System.Reflection.Emit Namespace documentation.
- Concept:
Reflection.Emitprovides classes that mirror the structure of a .NET assembly, module, and type. You can create these “builders” and then use anILGeneratorto write the low-level IL instructions that define the behavior of methods. - Components:
AssemblyBuilder: Represents a dynamic assembly.ModuleBuilder: Represents a dynamic module within an assembly.TypeBuilder: Represents a dynamic class, struct, or interface.MethodBuilder: Represents a dynamic method or constructor.ILGenerator: The core class for emitting IL instructions. You call methods likeEmit(OpCodes.Ldarg_0),Emit(OpCodes.Call), etc.
-
General Process:
- Create an
AssemblyBuilder(and optionally save it to disk). - Create a
ModuleBuilderwithin the assembly. - Create a
TypeBuilderfor the new class/struct. - Define fields, properties, and methods using
FieldBuilder,PropertyBuilder,MethodBuilder. - Obtain an
ILGeneratorfrom theMethodBuilder. - Use
ILGenerator.Emitto write the IL instructions for the method’s body. - Call
TypeBuilder.CreateType()to “bake” the type definition. - Use
Activator.CreateInstance(or reflection methods) to create instances of the dynamically generated type. - Call methods on the instance, which will execute the emitted IL.
- Create an
- Use Cases (Highly Niche and Advanced):
- High-Performance Serialization/Deserialization: Libraries like
ProtoBuf.NETor older versions ofNewtonsoft.Json(before source generators became prevalent) usedReflection.Emitto dynamically generate highly optimized serialization code for specific types. - ORM Mappers: Generating dynamic proxy types or mapping logic.
- AOP Frameworks: Creating proxies that intercept method calls.
- Dynamic Language Runtimes: Implementing dynamic behaviors for scripting languages.
- Code Weaving: Injecting code into existing assemblies at runtime.
- High-Performance Serialization/Deserialization: Libraries like
- Complexity and Debugging Challenges:
Reflection.Emitis extremely complex to use. It requires a deep understanding of IL opcodes, the .NET type system, and the stack-based nature of IL execution.- Debugging dynamically emitted code is notoriously difficult. Runtime exceptions in generated code are often cryptic.
- Security concerns: Generating arbitrary code at runtime can be a security risk if not properly constrained.
- Alternatives:
- Expression Trees: For simpler dynamic code generation (e.g., property accessors, simple method calls), Expression Trees (from
System.Linq.Expressions) provide a higher-level, more type-safe API that compiles to IL. They are generally preferred overReflection.Emitwhen their capabilities suffice. - Source Generators (C# 9+): These are a compile-time code generation mechanism. Instead of generating IL at runtime, source generators produce C# source code during compilation, which is then compiled into the assembly. This is often a better alternative for boilerplate generation or cross-cutting concerns that can be known at compile time, offering better debugging and performance characteristics than
Reflection.Emit.
- Expression Trees: For simpler dynamic code generation (e.g., property accessors, simple method calls), Expression Trees (from
5.5. Runtime Type Handles and Type Identity
Underneath the user-friendly System.Type class, the CLR uses more primitive, internal representations to identify and manage types, methods, and fields efficiently at runtime. These are known as runtime handles.
-
Concept: A runtime handle (e.g.,
RuntimeTypeHandle,RuntimeMethodHandle,RuntimeFieldHandle) is a low-level, opaque pointer or identifier that the CLR uses internally to uniquely identify a type, method, or field definition within its runtime structures (like the Method Table, as discussed in Chapter 3). They are typicallystructs. -
RuntimeTypeHandle:- Internal Representation: This is the CLR’s internal representation for a specific
System.Type. EveryTypeinstance has a uniqueRuntimeTypeHandle. - Access: You can access the
RuntimeTypeHandleof aTypeobject via itsTypeHandleproperty:Type myClassType = typeof(MyClass); RuntimeTypeHandle handle = myClassType.TypeHandle; - Significance:
RuntimeTypeHandleis critical for internal CLR operations:- Type Lookups: When the CLR needs to resolve a type (e.g., during
isorasoperations, or when performing virtual method dispatch), it uses these handles for rapid lookup in its internal tables (like the Method Table). - Type Equality:
RuntimeTypeHandleallows for extremely fast comparison of type identities. TwoTypeobjects refer to the same runtime type if and only if theirRuntimeTypeHandlevalues are equal. - Method Table Reference: Conceptually, the
RuntimeTypeHandleencapsulates a pointer or reference to the type’s Method Table (or equivalent internal metadata structure), which contains all the type’s runtime information.
- Type Lookups: When the CLR needs to resolve a type (e.g., during
- Internal Representation: This is the CLR’s internal representation for a specific
-
RuntimeMethodHandleandRuntimeFieldHandle:- Similar to
RuntimeTypeHandle, these are internal identifiers for specific methods and fields. - They are exposed through
MethodInfo.MethodHandleandFieldInfo.FieldHandleproperties, respectively. - They allow the CLR to quickly locate and invoke methods or access fields at runtime.
- Similar to
While RuntimeTypeHandle, RuntimeMethodHandle, and RuntimeFieldHandle are rarely directly manipulated by application developers, understanding their existence explains how the CLR achieves its high performance in type resolution, polymorphism, and reflection. They are the efficient, low-level glue that binds the IL and metadata to native execution.
5.6. Attributes: Metadata for Control and Information
Attributes are a powerful C# feature that allows you to declaratively associate metadata (descriptive information) with code elements. They are a form of structured metadata that can be applied to assemblies, modules, types (classes, structs, enums, interfaces, delegates), members (methods, properties, fields, events), parameters, and even return values.
Attributes themselves are special classes that inherit directly or indirectly from System.Attribute. They are processed at various stages, influencing the compiler, runtime, or external tools.
For more details on attributes, see Attributes in C#.
Common Usage and Core Behaviors
Many built-in attributes are used extensively throughout the .NET framework to convey intent or alter behavior. Here’s a deep dive into some frequently used examples:
-
[Obsolete(string message, bool error)](System):- Purpose: Marks a type or member as no longer recommended for use.
- Behavior: The compiler emits a warning (or an error if
erroristrue) when code attempts to use an obsolete member. -
Example:
[Obsolete("Use the new CalculateTotalAsync method instead.", true)] // Will cause a compile-time error public decimal CalculateTotal(IEnumerable<Item> items) { /* ... */ } public async Task<decimal> CalculateTotalAsync(IAsyncEnumerable<Item> items) { /* ... */ } - Impact: Primarily a compile-time tool for guiding developers during compilation.
-
[Serializable](System):- Purpose: Marks a class or struct as eligible for binary serialization (converting an object’s state into a stream of bytes for storage or transmission).
- Behavior: The .NET BinaryFormatter (older serialization mechanism, largely deprecated in modern .NET due to security risks) uses this attribute to determine if a type can be serialized.
- Impact: Runtime behavior influencing specific serialization frameworks. Less relevant for
System.Text.JsonorNewtonsoft.Jsonwhich use different mechanisms (often property discovery or custom converters).
-
[Conditional("SYMBOL")](System.Diagnostics):- Purpose: Allows method calls to be conditionally included or excluded during compilation based on the presence of a preprocessor symbol.
- Behavior: If the specified
SYMBOLis not defined, all calls to methods marked with this attribute are entirely removed from the compiled IL. If the symbol is defined, the calls are included. -
Example:
#define DEBUG_LOGGING // Comment out this line to remove log calls using System.Diagnostics; public class MyLogger { [Conditional("DEBUG_LOGGING")] public static void Log(string message) { Console.WriteLine($"[DEBUG] {message}"); } public void ProcessData() { Log("Starting data processing."); // Call will be compiled only if DEBUG_LOGGING is defined // ... Log("Data processing complete."); } } - Impact: Compile-time optimization for logging, debugging, or feature toggles. No runtime overhead if the symbol is undefined.
-
[MethodImpl(MethodImplOptions options)](System.Runtime.CompilerServices):- Purpose: Provides hints to the JIT compiler about how a method should be optimized.
- Behavior: Influences JIT compilation strategy.
- Common Options:
MethodImplOptions.AggressiveInlining: Strongly suggests to the JIT compiler that it should inline the method (insert its code directly into the calling method) if possible. Can improve performance by reducing call overhead for small, hot methods.MethodImplOptions.NoOptimization: Prevents JIT optimizations for the method (useful for debugging specific behavior).MethodImplOptions.NoInlining: Prevents the JIT compiler from inlining the method.
- Impact: Runtime performance optimization. The JIT compiler may ignore hints if it determines they are not beneficial or feasible.
-
[DllImport("library.dll", ...)](System.Runtime.InteropServices):- Purpose: The cornerstone of Platform Invocation Services (P/Invoke), allowing C# code to call unmanaged functions exported from native DLLs (e.g., Windows API, custom C++ libraries).
- Behavior: Tells the CLR that the method it’s applied to is actually an external unmanaged function. The CLR then handles marshaling data types between managed and unmanaged memory.
-
Example:
using System.Runtime.InteropServices; public class NativeMethods { [DllImport("user32.dll", CharSet = CharSet.Unicode, SetLastError = true)] public static extern int MessageBox(IntPtr hWnd, string lpText, string lpCaption, uint uType); public static void ShowNativeMessage() { MessageBox(IntPtr.Zero, "Hello from P/Invoke!", "Native Title", 0); } } - Impact: Enables interoperability with native code. Primarily a runtime mechanism.
-
[GeneratedCode(string tool, string version)](System.CodeDom.Compiler):- Purpose: Indicates that a code element (class, method, etc.) was automatically generated by a tool.
- Behavior: Code analysis tools (like Roslyn analyzers, static analysis tools) often use this attribute to ignore generated code, preventing false positives or unnecessary warnings.
- Impact: Primarily influences external tools and code analyzers.
-
Caller Info Attributes (C# 5+):
[CallerMemberName],[CallerFilePath],[CallerLineNumber](System.Runtime.CompilerServices):- Purpose: Allows you to obtain information about the caller of a method without using reflection or passing arguments explicitly. Very useful for logging, debugging, and tracing.
- Behavior: The C# compiler automatically injects the appropriate string literals or integer values into the method arguments at compile time.
-
Example:
public static void LogMessage( string message, [CallerMemberName] string memberName = "", [CallerFilePath] string filePath = "", [CallerLineNumber] int lineNumber = 0) { Console.WriteLine($"{filePath}({lineNumber}): {memberName} - {message}"); } public void MyMethod() { LogMessage("Operation started."); // No arguments needed here, compiler injects them } - Impact: Compile-time code transformation for cleaner logging/debugging. No runtime overhead for parameter inference.
-
Nullability Analysis Attributes (C# 8+):
[NotNullWhen],[DoesNotReturn], etc. (System.Diagnostics.CodeAnalysis):- Purpose: Provide hints to the C# compiler’s nullable analysis to improve its accuracy.
- Behavior: These attributes allow you to specify post-conditions or states that the nullable analysis should assume after a method call.
-
Example:
using System.Diagnostics.CodeAnalysis; public static bool TryParse([NotNullWhen(true)] string? input, out int result) { result = 0; if (int.TryParse(input, out result)) { return true; } return false; } public static void Validate([DoesNotReturnIf(false)] bool condition, string message) { if (!condition) { throw new ArgumentException(message); } } // Usage: string? text = Console.ReadLine(); if (TryParse(text, out int num)) // Compiler knows 'text' is not null if TryParse returns true { Console.WriteLine($"Parsed: {num}"); } Validate(num > 0, "Number must be positive."); // Compiler knows execution won't return if num <= 0 - Impact: Compile-time enhancement of static analysis (nullable warnings). No runtime impact.
-
[SetsRequiredMembers](C# 11):- Purpose: Used with
requiredmembers (C# 11) to tell the compiler that a constructor or method initializes allrequiredmembers of a class. - Behavior: Resolves compiler warnings (CS9035) when a constructor delegates to another constructor that doesn’t explicitly initialize
requiredmembers, but the compiler knows they are set indirectly. - Impact: Compile-time compiler behavior.
- Purpose: Used with
Attributes are powerful tools for enriching your code with declarative metadata, enabling various forms of static analysis, runtime behavior modification, and tool integration.
5.7. Custom Attributes: Definition, Usage, and Reflection
Beyond the built-in attributes, C# allows you to define and use your own custom attributes. This enables you to embed application-specific metadata directly into your code, which can then be retrieved and acted upon at runtime using reflection, or processed at compile time by custom tools.
For defining custom attributes, refer to Create custom attributes.
Defining a Custom Attribute
To define a custom attribute, you create a class that inherits directly or indirectly from System.Attribute. By convention (though not strictly enforced by the compiler), custom attribute class names end with the suffix “Attribute” (e.g., MyCustomAttribute). When applied in code, this suffix can be omitted (e.g., [MyCustom] instead of [MyCustomAttribute]).
using System;

// 1. Define the attribute.
// Inherit from System.Attribute.
// Apply [AttributeUsage] to control where it can be used.
[AttributeUsage(AttributeTargets.Class | AttributeTargets.Method, AllowMultiple = true, Inherited = false)]
public class ChangeLogAttribute : Attribute
{
    public string Version { get; }
    public string Description { get; }
    public DateTime Date { get; }

    // Constructor parameters become positional parameters when applying the attribute
    public ChangeLogAttribute(string version, string description)
    {
        Version = version;
        Description = description;
        Date = DateTime.Now; // Or take as parameter if needed
    }

    // Public properties (read-write) can be set as named parameters
    public string? Author { get; set; }
}
[AttributeUsage]Attribute: This attribute itself is used to control how your custom attribute can be applied:AttributeTargets: Specifies the code elements to which the attribute can be applied (e.g.,Class,Method,Property,All). You can combine them using|.AllowMultiple: Aboolindicating whether multiple instances of the attribute can be applied to a single code element (truefor multiple,falsefor single).Inherited: Aboolindicating whether the attribute is inherited by derived classes or overridden members (truefor inherited,falsefor not).
Applying Custom Attributes
Once defined, you apply custom attributes using square brackets [] before the target code element:
// 2. Apply the attribute to code elements.
[ChangeLog("1.0.0", "Initial version of the user service.")]
[ChangeLog("1.0.1", "Added user validation.", Author = "Jane Doe")] // AllowMultiple allows this
public class UserService
{
    [ChangeLog("1.0.0", "Introduced new user creation logic.")]
    public void CreateUser(string username, string password)
    {
        // ...
    }

    [ChangeLog("1.1.0", "Improved performance for user retrieval.")]
    public User GetUserById(int id)
    {
        // ...
        return new User();
    }
}

public class User {} // Dummy class
Processing Custom Attributes
Custom attributes can be processed at different stages:
-
Compile-Time (by Tools): Tools like Roslyn analyzers, static code analysis tools (e.g., StyleCop, FxCop), or custom build-time processors can read the attributes from the source code or the compiled IL and act upon them. This happens before the application runs. For instance, a custom build tool might generate documentation based on
[ChangeLog]attributes. -
Runtime (by Reflection): This is the most common way to process custom attributes in C#. You use
System.Reflectionto discover and read the attribute instances associated with types or members.// 3. Process the attribute at runtime using Reflection. public class AttributeProcessor { public static void ProcessChangeLogs() { Type userServiceType = typeof(UserService); // Get attributes applied to the class object[] classAttributes = userServiceType.GetCustomAttributes(typeof(ChangeLogAttribute), false); Console.WriteLine($"--- Change Logs for Class: {userServiceType.Name} ---"); foreach (ChangeLogAttribute attr in classAttributes.Cast<ChangeLogAttribute>()) { Console.WriteLine($"- V{attr.Version} ({attr.Date.ToShortDateString()}): {attr.Description} (Author: {attr.Author ?? "N/A"})"); } // Get attributes applied to methods foreach (MethodInfo method in userServiceType.GetMethods(BindingFlags.Public | BindingFlags.Instance | BindingFlags.DeclaredOnly)) { object[] methodAttributes = method.GetCustomAttributes(typeof(ChangeLogAttribute), false); if (methodAttributes.Length > 0) { Console.WriteLine($"\n--- Change Logs for Method: {method.Name} ---"); foreach (ChangeLogAttribute attr in methodAttributes.Cast<ChangeLogAttribute>()) { Console.WriteLine($"- V{attr.Version} ({attr.Date.ToShortDateString()}): {attr.Description} (Author: {attr.Author ?? "N/A"})"); } } } } } // Call this from your Main method: // AttributeProcessor.ProcessChangeLogs(); /* Expected Output (dates will vary): --- Change Logs for Class: UserService --- - V1.0.0 (7/5/2025): Initial version of the user service. (Author: N/A) - V1.0.1 (7/5/2025): Added user validation. (Author: Jane Doe) --- Change Logs for Method: CreateUser --- - V1.0.0 (7/5/2025): Introduced new user creation logic. (Author: N/A) --- Change Logs for Method: GetUserById --- - V1.1.0 (7/5/2025): Improved performance for user retrieval. (Author: N/A) */
Design Considerations for Custom Attributes
-
Benefits:
- Declarative Programming: Express intent and attach configuration directly to code elements without altering core logic.
- Separation of Concerns: Separate cross-cutting concerns (e.g., validation rules, security permissions, logging behavior) from the main app logic.
- Extensibility: Provide an easy way for frameworks and libraries to define behaviors that can be “switched on” or configured by users of the library.
- Readability: Can make code more self-documenting for specific metadata.
-
Drawbacks:
- Hidden Logic: Logic triggered by attributes can be less obvious than direct method calls, potentially making code harder to debug or trace.
- Performance Overhead (at Runtime): Retrieving attributes at runtime using reflection incurs the same performance costs as other reflection operations. Avoid extensive attribute reflection in hot paths.
- Magic Strings/Constants: If attribute arguments are strings or magic numbers, it can lead to brittle code. Prefer enums or well-defined constants.
Custom attributes are a powerful feature for adding declarative metadata to your code, forming a vital part of many modern C# frameworks and libraries. They embody the principle of “convention over configuration” by allowing you to mark elements with metadata that downstream systems can interpret.
Key Takeaways
- Assemblies: Deployment Unit: Assemblies (
.dll,.exe) are self-describing units containing IL, metadata, and resources. They are the fundamental building blocks for deployment and versioning in .NET. - Assembly Loading Process: The CLR resolves (identifies), locates (probes paths like the application base, private paths, GAC), and loads assemblies at runtime, performing verification and JIT compilation on demand.
AssemblyLoadContextfor Isolation: In modern .NET,AssemblyLoadContextprovides isolated environments for loading assemblies, crucial for plugin architectures, hot-reloading, and resolving “DLL Hell” scenarios by enabling different components to use conflicting dependency versions. It typically employs a parent-first loading strategy.- Namespaces: Compile-Time Organization: Namespaces (
namespace) logically group types to prevent naming collisions. They are a compile-time construct with no runtime performance impact. - C# 10 Improvements:
- File-Scoped Namespaces (
namespace My.App;): Reduce indentation and boilerplate in single-namespace files. - Global Usings (
global using System;): Centralize commonusingdirectives for an entire project, significantly cleaning up individual source files..NET SDKoften generates these implicitly.
- File-Scoped Namespaces (
- Metadata: Data About Data: Assemblies contain rich metadata describing types, members, and references.
- Reflection: Runtime Metadata Inspection:
System.Reflectionallows you to inspect this metadata at runtime viaSystem.Typeobjects. It enables late binding (dynamic method invocation/property access). - Reflection Performance Trade-offs: Extremely powerful and flexible but incurs significant performance overhead. Use sparingly in hot paths, or mitigate with caching, Expression Trees, or
Reflection.Emit. System.Reflection.Emit: Dynamic Code Generation: A highly advanced and complex API for programmatically generating IL at runtime to create new types and methods. Used in niche, high-performance scenarios like custom serializers or ORMs.- Runtime Handles (
RuntimeTypeHandle): Low-level internal identifiers (structs) used by the CLR for efficient type and member lookups, underpinning reflection and polymorphic dispatch. - Attributes: Declarative Metadata: Inheriting from
System.Attribute, they declaratively attach metadata to code elements. - Built-in Attributes: Influence compiler (
[Obsolete],[Conditional],[CallerMemberName]), JIT ([MethodImpl]), runtime ([DllImport],[Serializable]), or tools ([GeneratedCode]). - Custom Attributes: Defined by developers to add application-specific metadata. They are typically discovered and processed at runtime using reflection.
[AttributeUsage]controls where they can be applied and their inheritance. Custom attributes enable powerful declarative programming and separation of concerns.
6. Access Modifiers: Visibility, Encapsulation, and Advanced Scenarios
Access modifiers are fundamental keywords in C# that control the visibility and accessibility of types and their members. They are the cornerstone of encapsulation, a core principle of object-oriented programming that advocates for bundling data with the methods that operate on that data, and restricting direct access to some of the component’s parts. By carefully choosing access modifiers, developers can design robust APIs, protect internal implementation details, and manage the complexity of large codebases.
This chapter will systematically explore each C# access modifier, from the most basic to the nuanced, inheritance-specific ones, including the C# 11 file modifier. We will delve into how they define scope at different levels: within a type, across assemblies, and within class hierarchies.
Overview of access modifiers:
- Elements Defined in Namespaces: can be
public,internal, orfile - Members of Types (methods, properties, nested types etc.) can be
public,private,protected,internal,protected internal, orprivate protected.
For a general overview of access modifiers, refer to the Microsoft Learn documentation on access modifiers.
6.1. Fundamental Modifiers (public, private)
Let’s begin with the two most common and straightforward access modifiers.
public
The public keyword grants the widest possible access. When a type or a member is declared public, it is accessible from anywhere:
- From within the same class or struct.
- From within any other type in the same assembly.
- From within any type in any other assembly that references the assembly containing the
publicmember.
Purpose: public members form the public API (Application Programming Interface) of your types and libraries. They represent the intended way for other parts of your application, or external consumers of your library, to interact with your code.
Example:
// Assembly: MyApplication.Core.dll
namespace MyApplication.Core
{
    public class Product
    {
        // Public property - accessible from anywhere
        public int ProductId { get; set; }

        // Public method - accessible from anywhere
        public void DisplayProductInfo()
        {
            Console.WriteLine($"Product ID: {ProductId}");
        }
    }
}

// In a different assembly (e.g., MyApplication.UI.exe, referencing MyApplication.Core.dll)
namespace MyApplication.UI
{
    public class ProductViewer
    {
        public void ShowProduct()
        {
            Product product = new Product { ProductId = 101 }; // Accessible
            product.DisplayProductInfo(); // Accessible
        }
    }
}
private
The private keyword grants the most restrictive access. When a member is declared private, it is accessible only from within its declaring type. No other types (with the exception of nested types) can directly access a private member.
Purpose: private members are used to encapsulate the internal implementation details of a class or struct. They protect the internal state and logic, ensuring that external code cannot inadvertently break the object’s invariants. This is crucial for maintaining the integrity and predictability of your objects.
Example:
// Assembly: MyPaymentProcessor.dll
namespace MyPaymentProcessor
{
    public class PaymentGateway
    {
        // Private field - only accessible within PaymentGateway class
        private string _apiKey;

        // Public constructor
        public PaymentGateway(string apiKey)
        {
            _apiKey = apiKey;
        }

        // Public method using a private helper method
        public bool ProcessPayment(decimal amount, string cardNumber)
        {
            if (!IsValidCardNumber(cardNumber)) // Accessible: IsValidCardNumber is private but within same class
            {
                Console.WriteLine("Invalid card number.");
                return false;
            }
            // Use _apiKey for actual payment processing...
            Console.WriteLine($"Processing payment of {amount:C} with API Key: {_apiKey.Substring(0, 4)}..."); // Accessible
            return true;
        }

        // Private method - only accessible within PaymentGateway class
        private bool IsValidCardNumber(string cardNumber)
        {
            // Complex validation logic...
            return cardNumber.Length == 16;
        }
    }
}

// In a different class (even in the same assembly)
namespace MyPaymentProcessor
{
    public class PaymentInitiator
    {
        public void Initiate()
        {
            PaymentGateway gateway = new PaymentGateway("your_api_key");
            gateway.ProcessPayment(100.00m, "1234567890123456");

            // gateway._apiKey; // ERROR: Inaccessible due to its protection level
            // gateway.IsValidCardNumber("..."); // ERROR: Inaccessible due to its protection level
        }
    }
}
6.2. Assembly-level Modifiers (internal, file C# 11)
These modifiers define access boundaries at the assembly level, which is a critical boundary in .NET for modularity and deployment.
internal
The internal keyword limits access to the containing assembly. When a type or member is declared internal, it is accessible from any code within the same assembly, but not from code in other assemblies.
Purpose: internal is ideal for components that are part of a library’s implementation but are not intended to be part of its public API. It allows for modularity within a single assembly (e.g., helper classes, internal utilities) without exposing them to external consumers.
Example:
// Assembly: MySharedLibrary.dll

// Internal class - only accessible within MySharedLibrary.dll
internal class InternalLogger
{
    public void Log(string message)
    {
        Console.WriteLine($"[INTERNAL LOG]: {message}");
    }
}

public class PublicService
{
    // Internal method - only accessible within MySharedLibrary.dll
    internal void PerformInternalOperation()
    {
        InternalLogger logger = new InternalLogger(); // Accessible: within same assembly
        logger.Log("Performing internal operation.");
    }

    public void DoSomethingPublic()
    {
        PerformInternalOperation(); // Accessible
    }
}

// In a different assembly (e.g., MyApplication.exe, referencing MySharedLibrary.dll)
// using MySharedLibrary; // Need to reference the assembly

// public class Consumer
// {
//     public void UseLibrary()
//     {
//         PublicService service = new PublicService();
//         service.DoSomethingPublic(); // Accessible

//         // InternalLogger logger = new InternalLogger(); // ERROR: Inaccessible due to its protection level
//         // service.PerformInternalOperation(); // ERROR: Inaccessible due to its protection level
//     }
// }
InternalsVisibleTo Attribute
While internal provides strong encapsulation at the assembly level, there are legitimate scenarios where you might need to “break” this encapsulation in a controlled way. The most common use case is for unit testing: you want your test assembly to be able to access internal members of the assembly under test without making those members public.
The System.Runtime.CompilerServices.InternalsVisibleToAttribute allows you to grant access to internal types and members to a specific friend assembly.
Usage: This attribute is applied at the assembly level, typically in the AssemblyInfo.cs file (or directly in your .csproj for SDK-style projects).
// In MySharedLibrary.csproj (for SDK-style project)
<ItemGroup>
    <AssemblyAttribute Include="System.Runtime.CompilerServices.InternalsVisibleTo">
        <_Parameter1>MySharedLibrary.Tests</_Parameter1>
    </AssemblyAttribute>
</ItemGroup>

// Or in AssemblyInfo.cs (for non-SDK style or explicit control)
// [assembly: System.Runtime.CompilerServices.InternalsVisibleTo("MySharedLibrary.Tests")]
// [assembly: System.Runtime.CompilerServices.InternalsVisibleTo("MySharedLibrary.Tests, PublicKey=...")]
Now, in MySharedLibrary.Tests.dll, you can access internal members of MySharedLibrary.dll:
// Assembly: MySharedLibrary.Tests.dll (references MySharedLibrary.dll)
using Xunit;
using MySharedLibrary; // Using the namespace of the assembly under test

public class PublicServiceTests
{
    [Fact]
    public void PerformInternalOperation_CanBeAccessedByTests()
    {
        PublicService service = new PublicService();
        service.PerformInternalOperation(); // Accessible now due to InternalsVisibleTo!
        // Assertions...
    }

    [Fact]
    public void InternalLogger_CanBeInstantiatedByTests()
    {
        InternalLogger logger = new InternalLogger(); // Accessible now
        logger.Log("Test log from internal logger.");
    }
}
Trade-offs: While useful, InternalsVisibleTo does weaken strict encapsulation. It should be used judiciously, primarily for testing or very tightly coupled, trusted companion assemblies.
file (C# 11)
The file access modifier, introduced in C# 11, provides the most restrictive scope, even more so than private for top-level types. When a type (class, struct, interface, enum, delegate) is declared file, it is accessible only within the single source file in which it is declared.
Purpose: file types are ideal for helper types that are truly internal to the implementation of a specific source file and should not be exposed even to other files within the same assembly. This prevents naming conflicts and keeps the scope of such helper types extremely narrow.
Example:
// File: DataProcessor.cs
namespace MyProject.Data
{
    // This class is only accessible from within DataProcessor.cs
    file class DataConverter
    {
        internal static string ConvertToString(byte[] data)
        {
            // Some conversion logic
            return BitConverter.ToString(data);
        }
    }

    public class DataProcessor
    {
        public string ProcessBytes(byte[] bytes)
        {
            return DataConverter.ConvertToString(bytes); // Accessible: within the same file
        }
    }
}

// File: ReportGenerator.cs (in the same MyProject.Data assembly)
namespace MyProject.Data
{
    public class ReportGenerator
    {
        public void Generate()
        {
            // DataConverter converter = new DataConverter(); // ERROR: Inaccessible due to its protection level
            // This type is not visible here, even though it's in the same assembly and namespace.
        }
    }
}
Trade-offs: file types enhance encapsulation at a very granular level. The primary trade-off is reduced reusability; if a helper type might be useful in another source file within the same assembly, internal is a more appropriate choice.
6.3. Inheritance-based Modifiers (protected, private protected C# 7.2, protected internal)
These modifiers become relevant when dealing with class hierarchies and inheritance, allowing controlled access to members by derived classes.
protected
The protected keyword allows access to a member from within its declaring type and from within any derived class (subclass), regardless of whether the derived class is in the same assembly or a different assembly.
Purpose: protected members are typically used for implementation details or extensibility points that are only relevant to the inheritance chain. They expose functionality to subclasses while keeping it hidden from unrelated external code.
Example:
// Assembly: GraphicsLibrary.dll
namespace Graphics
{
    public abstract class Shape
    {
        // Protected field - accessible by Shape and any derived class
        protected string _color;

        public Shape(string color)
        {
            _color = color;
        }

        // Protected method - accessible by Shape and any derived class
        protected void DrawBase()
        {
            Console.WriteLine($"Drawing a shape with color: {_color}");
        }

        public abstract void Draw();
    }
}

// Assembly: MyApplication.Drawing.dll (references GraphicsLibrary.dll)
namespace MyApplication.Drawing
{
    public class Circle : Graphics.Shape // Derived class in a different assembly
    {
        public double Radius { get; set; }

        public Circle(string color, double radius) : base(color)
        {
            Radius = radius;
        }

        public override void Draw()
        {
            DrawBase(); // Accessible: protected member from base class
            Console.WriteLine($"Drawing a circle with radius {Radius}");
            Console.WriteLine($"Color (accessed directly): {_color}"); // Accessible: protected field
        }
    }
}

// In a non-derived class (even in the same assembly)
// public class ExternalDrawer
// {
//     public void Test()
//     {
//         Circle circle = new Circle("Blue", 5.0);
//         // circle._color; // ERROR: Inaccessible
//         // circle.DrawBase(); // ERROR: Inaccessible
//     }
// }
protected internal
The protected internal keyword is a combination of protected and internal. It allows access from:
- Any code within the same assembly (like
internal). - OR from any derived class, regardless of assembly (like
protected).
Think of it as a logical “OR” operation: if either protected or internal rules apply, access is granted.
Purpose: This modifier is used when you want a member to be accessible by your entire assembly, and by any subclass, even if that subclass is in a different assembly. It’s less restrictive than protected alone, but more restrictive than public. It’s often used when a base class provides an extensibility point that should be widely available within the library, and also to all future implementers (subclasses).
Example:
// Assembly: BaseLibrary.dll
namespace BaseLibrary
{
    public class BaseComponent
    {
        // Accessible from any type in BaseLibrary.dll
        // OR any derived type (even in other assemblies)
        protected internal virtual void InitializeComponent()
        {
            Console.WriteLine("BaseComponent: Initializing...");
        }
    }
}

// Assembly: ConsumerApp.exe (references BaseLibrary.dll)
using BaseLibrary;

public class MyConsumerClass
{
    public void AccessInternalProtected()
    {
        // BaseComponent component = new BaseComponent();
        // component.InitializeComponent(); // ERROR: Not accessible from non-derived class in different assembly
    }
}

// Derived class in a DIFFERENT assembly
public class DerivedComponentFromOtherAssembly : BaseLibrary.BaseComponent
{
    public void Setup()
    {
        InitializeComponent(); // Accessible: derived class in different assembly
        Console.WriteLine("DerivedComponent (Other Assembly): Setting up.");
    }
}

// Non-derived class IN THE SAME assembly as BaseComponent
// (This is illustrative, assume BaseLibrary.dll had another class)
namespace BaseLibrary
{
    public class InternalHelper
    {
        public void CallInit()
        {
            BaseComponent component = new BaseComponent();
            component.InitializeComponent(); // Accessible: same assembly
            Console.WriteLine("InternalHelper: Called InitializeComponent.");
        }
    }
}
private protected (C# 7.2)
Introduced in C# 7.2, the private protected modifier provides something between private and protected. A private protected member is accessible by types derived from the containing class, but only within its containing assembly.
Think of this as a logical “AND” operation: both protected and internal rules must apply to grant access.
Purpose: This modifier is useful for base classes in libraries where you want to expose certain members for inheritance, but only to subclasses that are part of the same library. It provides a stronger encapsulation boundary than just protected, preventing external libraries from extending internal implementation details.
Example:
// Assembly: CoreFramework.dll
namespace CoreFramework
{
    public class BaseEngine
    {
        // Accessible only within BaseEngine
        // OR by derived types in CoreFramework.dll
        private protected void RunEngineDiagnostics()
        {
            Console.WriteLine("BaseEngine: Running diagnostics (private protected).");
        }

        public virtual void Start()
        {
            RunEngineDiagnostics(); // Accessible: within declaring type
            Console.WriteLine("BaseEngine: Started.");
        }
    }
}

// Derived class IN THE SAME assembly (CoreFramework.dll)
namespace CoreFramework
{
    public class MySpecificEngine : BaseEngine
    {
        public override void Start()
        {
            base.Start();
            RunEngineDiagnostics(); // Accessible: derived class in same assembly
            Console.WriteLine("MySpecificEngine: Started (same assembly).");
        }
    }
}

// Derived class in a DIFFERENT assembly (e.g., MyApplication.EngineExtension.dll, references CoreFramework.dll)
// namespace MyApplication.EngineExtension
// {
//     public class ExternalEngineExtension : CoreFramework.BaseEngine
//     {
//         public override void Start()
//         {
//             base.Start();
//             // RunEngineDiagnostics(); // ERROR: Inaccessible due to its protection level
//             // Even though it's a derived class, it's in a different assembly.
//             Console.WriteLine("ExternalEngineExtension: Started (different assembly).");
//         }
//     }
// }

// Non-derived class in the SAME assembly (CoreFramework.dll)
// namespace CoreFramework
// {
//     public class EngineMonitor
//     {
//         public void Monitor(BaseEngine engine)
//         {
//             // engine.RunEngineDiagnostics(); // ERROR: Inaccessible (not a derived class, even if same assembly)
//         }
//     }
// }
Comparison of Inheritance-based Access Modifiers
Understanding the subtle differences between protected, protected internal, and private protected is crucial. The table below summarizes their accessibility:
| Modifier | Accessible from declaring type? | Accessible from derived types in same assembly? | Accessible from derived types in different assembly? | Accessible from non-derived types in same assembly? | Accessible from non-derived types in different assembly? |
|---|---|---|---|---|---|
public |
Yes | Yes | Yes | Yes | Yes |
protected internal |
Yes | Yes | Yes | Yes | No |
protected |
Yes | Yes | Yes | No | No |
internal |
Yes | Yes | No | Yes | No |
private protected |
Yes | Yes | No | No | No |
private |
Yes | No | No | No | No |
file |
Yes | Yes if in same file | No | Yes if in same file | No |
6.4. Default Access Levels
When you declare a type or member without explicitly specifying an access modifier, C# applies a default access level. Understanding these defaults is important, though it’s generally good practice to explicitly state the intended access modifier for clarity.
-
Top-Level Types (non-nested types directly within a namespace):
class,struct,interface,enum,delegate(when not nested inside another type):- Default is
internal. -
  class MyClass { } // Implicitly internal class
  interface IMyInterface { } // Implicitly internal interface
  enum MyEnum { A, B } // Implicitly internal enum
- Default is
-
Nested Types (types declared inside another class, struct, etc.):
class,struct,interface,enum,delegate(when nested):- Default is
private. -
  public class OuterClass
  {
      class NestedClass { } // Implicitly private class
      enum NestedEnum { One, Two } // Implicitly private enum
  }
- Default is
-
Class Members (fields, methods, properties, events, constructors, indexers):
- When declared within a
class:- Default is
private. -
  public class MyClass
  {
      int _myField; // Implicitly private field
      void MyMethod() { } // Implicitly private method
  }
- Default is
- When declared within a
-
Struct Members (fields, methods, properties, events, constructors, indexers):
- When declared within a
struct:- Default is
private. -
  public struct MyStruct
  {
      int _value; // Implicitly private field
      void Increment() { _value++; } // Implicitly private method
  }
- Default is
- When declared within a
-
Interface Members (methods, properties, events, indexers):
- When declared within an
interface:- Default is
public. (In C# 8.0 and later, interfaces can have explicit access modifiers for members, butpublicis still the implicit default if none is specified for non-static members). -
  public interface ILogger
  {
      void Log(string message); // Implicitly public method
      int LogLevel { get; set; } // Implicitly public property
  }
- Default is
- When declared within an
-
Enum Members (fields representing enum values):
- When declared within an
enum:- Default is
public. -
  public enum Status
  {
      Active, // Implicitly public
      Inactive // Implicitly public
  }
- Default is
- When declared within an
While these defaults exist, explicitly specifying access modifiers is highly recommended. It improves code readability, reduces ambiguity, and makes the intended design clear to anyone reading your code, preventing unexpected accessibility issues.
Key Takeaways
- Encapsulation: Access modifiers are central to encapsulation, controlling visibility to protect internal state and ensure robust APIs.
public: Widest access, for public APIs accessible from any assembly.private: Most restrictive access, only within the declaring type, for internal implementation details.internal: Assembly-level access, visible within the same assembly but not to others. Ideal for internal library components.- **
InternalsVisibleTo:** A controlled exception tointernal` visibility, granting access to specific “friend” assemblies (e.g., for unit testing). file(C# 11): The most granular restriction, making a type visible only within the single source file it’s declared in, preventing naming conflicts and tightly encapsulating helpers.protected: Access within the declaring type and by any derived class, regardless of assembly. Used for inheritance-specific extensibility.protected internal: A logical OR, accessible by any type in the same assembly OR by any derived class (even in different assemblies). Broad inheritance visibility within and across assemblies.private protected(C# 7.2): A logical AND, accessible only by derived classes that are located within the same assembly. Provides tighter encapsulation for inheritance within a library.- Default Access: Types default to
internal(top-level) orprivate(nested). Members within classes/structs default toprivate. Interface and enum members implicitly default topublic. Always explicitly declare modifiers for clarity.
Where to Go Next
- Part I: The .NET Platform and Execution Model: Delving into the foundational environment of .NET and how C# code is compiled and executed.
- Part III: Core C# Types: Design and Deep Understanding: Mastering the essential building blocks of C# code, from object-oriented principles with classes and structs to modern type design and nullability.
- Part IV: Advanced C# Features: Generics, Patterns, LINQ, and More: Unlocking C#’s powerful and expressive features, delving into new programming paradigms, dynamic capabilities, and low-level compiler interactions.
- Part V: Concurrency, Performance, and Application Lifecycle: Covering critical aspects of building and maintaining high-performance C# applications, including asynchronous programming, optimization, debugging, and deployment.
- Part VI: Architectural Principles and Design Patterns: Understanding the overarching principles and established design patterns for structuring robust, maintainable, and scalable C# systems.
- Appendix: A collection of resources, practical checklists, and a glossary to support the learning journey.